5.3 LCD OSD (On-Screen Display) Configuration
5.4 Sharing USB Peripheral Devices
5.5 Powering Off and Restarting
5. Basic Operation
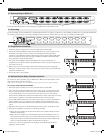
The LCD OSD allows you to set up and configure the LCD display:
• ToopenuptheLCDOSDmainmenu,pressthebuttonmarkedMenu.
• Usethe | and | buttonstonavigateandmakeadjustments.Afternavigatingtoa
settingchoice,usetheMenu buttontobringuptheadjustmentscreen.
• Whenmakingadjustments, | increasesthevalue; | decreasesthevalue.
• Whensatisfied,pressExit toreturntotheOSDmainmenu.
• Whenalladjustmentshavebeenmade,pressExit toclosetheLCDOSD.
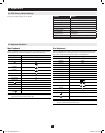
Thefollowingisanexplanationofthesettings:
Brightness Adjuststhebackgroundblacklevelofthescreenimage.
Contrast Adjuststheforegroundwhitelevelofthescreenimage.
Phase Adjuststheverticalsizeofthescreenimage.
Clock Adjuststhehorizontalsizeofthescreenimage.
H-Position PositionsthedisplayareaontheLCDpanelhorizontally(movesthedisplayarealeftorright).
V-Position PositionsthedisplayareaontheLCDpanelvertically(movesthedisplayareaupordown).
Color Temperature Adjuststhecolorqualityofthedisplaybetweenthreepre-configuredsettings;6500k,7500k,9300k.Thismenualso
allowsyoutocustomizetheindividualRGBsettingstoyourpreference.
Language SelectsthelanguagethattheOSDdisplaysitsmenusin.
OSD Duration AdjustthelengthofinactivitybeforetheOSDdisplayturnsoff(between5and100minutes).Thedefaultis5minutes.
Reset ResetsalloftheadjustmentsintheLCDOSDmenustotheirfactorydefaultsettings.
Note: Pressing the Exit button while not in the LCD OSD Menu will perform an auto-configuration on the monitor.
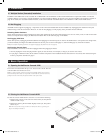
TheUSB1.1portontheConsoleKVMSwitch’sLCDpanelandtheB022-U16frontpanelcanbeusedtoshareUSBperipheralsbetweenconnectedcom-
puters.SimplyconnectaUSBperipheraldevicetothisport,andanyconnectedcomputeryouswitchtowillhaveaccesstothedevice.
Note: The following limitations apply to the USB peripheral port:
1. This port serves as a 1 port USB 1.1 hub; USB 2.0 devices will not function as designed.
2. USB peripherals can only be shared among computers that are connected to the KVM switch via the USB connectors on the P778-Series USB/PS2 Combo KVM Cable Kit.
3. USB peripherals can only be shared among computers that are connected to the KVM switch that the USB peripheral is plugged into. Computers that are connected to daisy-chained KVM
switches will not have access to the USB peripheral device.
IfitbecomesnecessarytopowerOFFtheKVMswitch,followtheprocedurebelow:
1. ShutdownallcomputersconnectedtotheKVMswitch.IfyouarepoweringOFFadaisy-chaininstallation,shutdownallcomputersconnectedto
eachKVMswitchintheinstallation.Note: It is necessary to unplug any computers that have the Keyboard Power ON function. If left on, the KVM
switch will continue to receive power via these computers.
2. TurnOFFtheKVMswitch(ConsoleKVMonly)andunplugtheKVMswitchfromitspowersource.PowerOFFandunplugeachKVMswitchin
thedaisy-chainsuccession.
3.Wait10secondsandthenplugtheKVMswitch,startingwiththefirststation,backintoitspowersource.TurnONthepowertotheKVMswitch
(ConsoleKVMonly).
4.OncethefirststationKVMswitchhasascertaineditspositioninthedaisy-chain,powerONandpluginthenextKVMswitchintheinstallation.
FollowthisprocedureforeachKVMswitchintheinstallation.
5.OnceallKVMswitchesintheinstallationhavebeenpoweredbackON,turnonthepowertoallconnectedcomputers.
10
Exit | | Menu
m m m m
201011080 • 932900-EN.indd 10 11/29/2010 4:30:13 PM