


AllKVMswitchessupporthotplugging—componentscanberemovedandaddedbackintotheinstallationbyunpluggingtheircablesfromtheports
withouthavingtoshuttheswitchdown.However,inorderforhotpluggingtoworkproperly,theseproceduresmustbefollowed:
Switching Station Positions
Switchstationpositionsbysimplyunpluggingthedaisy-chaincablefromtheoldparentandpluggingintoanewone.Afteryoudo,inorderfortheOSD
menustocorrespondtothechange,youmustresettheStationIDsviatheOSD.Seepage17fordetails.
Hot Plugging CPU Ports
SwitchCPUportsbyunpluggingtheKVMcablekitandrepluggingintothedesiredport.InorderfortheOSDmenustocorrespondtothechangemade,
youmustmanuallyreconfiguretheOSDinformationforthenewport.SeetheF3 SET (page15)andF4 ADM (page16),functionsfordetails.
Note: If the computer’s Operating System does not support hot plugging, this function may not work properly.
Hot Plugging Console Ports
Keyboard,monitor,andmousecanallbehotplugged.Whenhotpluggingthemouse:
1.Youmayunplugthemouseandplugitbackinagain(toresetthemouse,forexample),aslongasyouusethesame mouse.
2.Ifyoupluginadifferentmouse,allthestationsandallthecomputersontheinstallationmustbeshutdownfor10seconds,thenrestartedusingthe
PowerUpSequencedescribedonpage8.
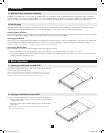
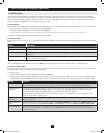
Theconsoleislocatedunderthetopcover.Toaccesstheconsole,slidethe
consolemoduleoutandraisethecover.
Note: As a safety precaution, to keep the console from accidentally sliding out, the console is
locked into the in position. Before you can pull the console module out, you must release it by
pushing the catches on the unit’s front panel toward the center of the switch.
4.8 Hot Plugging
5.1 Opening the NetDirector Console KVM
5.2 Closing the NetDirector Console KVM
4. Installation
5. Basic Operation
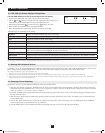
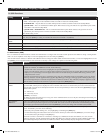
Toslidetheconsolemodulebackin,closethecoveranddothefollowing:
1. Pullthesafetycatchesontheunit’ssiderailstowardyouandpushthe
moduleinuntilitstops.
2. Releasethecatches;pullthemoduleslightlytowardyou;thenpushit
all the way in.
Note: The reason for the two-step procedure is to minimize the chances of pinching your
fingers when sliding the module in.
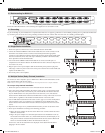
TheB022-U16KVMSwitchcanbecascadedoffofaB020-008-17-IPorB020-016-17-IPConsoleKVMSwitchtoexpandthenumberofconnected
computers.Beforeyoucanstartacascadedinstallation,youmustupgradetheB022-U16firmwaretobecascadecompatible.(SeeFirmwareUpgradeon
page18fordetails.)Forcascadedinstallationdetails,seetheowner’smanualoftheB020-008-17-IPorB020-016-17-IPConsoleKVMSwitch.
4.7 Multiple Station (Cascaded) Installation
9
201011080 • 932900-EN.indd 9 11/29/2010 4:30:13 PM