• Ifthefollowingconditionsoccur,unplugthedevicefromthewalloutletandbringittoqualifiedservicepersonnelforrepair:
• Thepowercordorplughasbecomedamagedorfrayed.
• Liquidhasbeenspilledintothedevice.
• Thedevicehasbeenexposedtorainorwater.
• Thedevicehasbeendropped,orthecabinethasbeendamaged.
• Thedeviceexhibitsadistinctchangeinperformance,indicatinganeedforservice.
• Thedevicedoesnotoperatenormallywhentheoperatinginstructionsarefollowed.
• Onlyadjustthosecontrolsthatarecoveredintheoperatinginstructions.Improperadjustmentofothercontrolsmayresultindamagethatwillrequire
extensiveworkbyaqualifiedtechniciantorepair.
• DonotconnecttheRJ-11connectormarked“UPGRADE”toapublictelecommunicationnetwork.
• Useofthisequipmentinlifesupportapplicationswherefailureofthisequipmentcanreasonablybeexpectedtocausethefailureofthelifesupport
equipmentortosignificantlyaffectitssafetyoreffectivenessisnotrecommended.Donotusethisequipmentinthepresenceofaflammable
anestheticmixturewithair,oxygenornitrousoxide.
Rack Mounting Safety Instructions
• Beforeworkingontherack,makesurethatthestabilizersaresecuredtotherack,extendedtothefloor,andthatthefullweightoftherackrestsonthe
floor.Installfrontandsidestabilizersonasinglerackorfrontstabilizersforjoinedmultipleracksbeforeworkingontherack.
• Alwaysloadtherackfromthebottomup,andloadtheheaviestitemintherackfirst.
• Makesurethattherackislevelandstablebeforeextendingadevicefromtherack.
• Usecautionwhenpressingthedevicerailreleaselatchesandslidingadeviceintooroutofarack;thesliderailscanpinchyourfingers.
• Afteradeviceisinsertedintotherack,carefullyextendtherailintoalockingposition,andthenslidethedeviceintotherack.
• DonotoverloadtheACsupplybranchcircuitthatprovidespowertotherack.
• Thetotalrackloadshouldnotexceed80percentofthebranchcircuitrating.
• Makesurethatallequipmentusedontherack(includingpowerstripsandotherelectricalconnectors)isproperlygrounded.
• Ensurethatproperairflowisprovidedtodevicesintherack.
• Ensurethattheoperatingambienttemperatureoftherackenvironmentdoesnotexceedthemaximumambienttemperaturespecifiedfortheequipment
bythemanufacturer.
• Donotsteponorstandonanydevicewhenservicingotherdevicesinarack
4.1 Pre-Installation Safety Instructions (continued)
4. Installation
TheNetDirectorConsoleKVMSwitchisdesignedformountingina1Uracksystem.Forconvenience,arackmountingkitisincludedwithyourKVMfor
quickinstallation.Thevariousmountingoptionsareexplainedinthesectionsthatfollow:
Note:
1. It is recommended that the unit be installed by two people; one to hold it in place and the other to attach it to the rack.
2. The rackmounting kit that comes with the unit does not include screws or cage nuts. Contact your rack dealer for this hardware.
3. Allow at least 5.1 cm on each side for proper ventilation, and at least 12.7 cm at the rear of the unit for the power cord and cable kits.
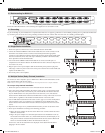
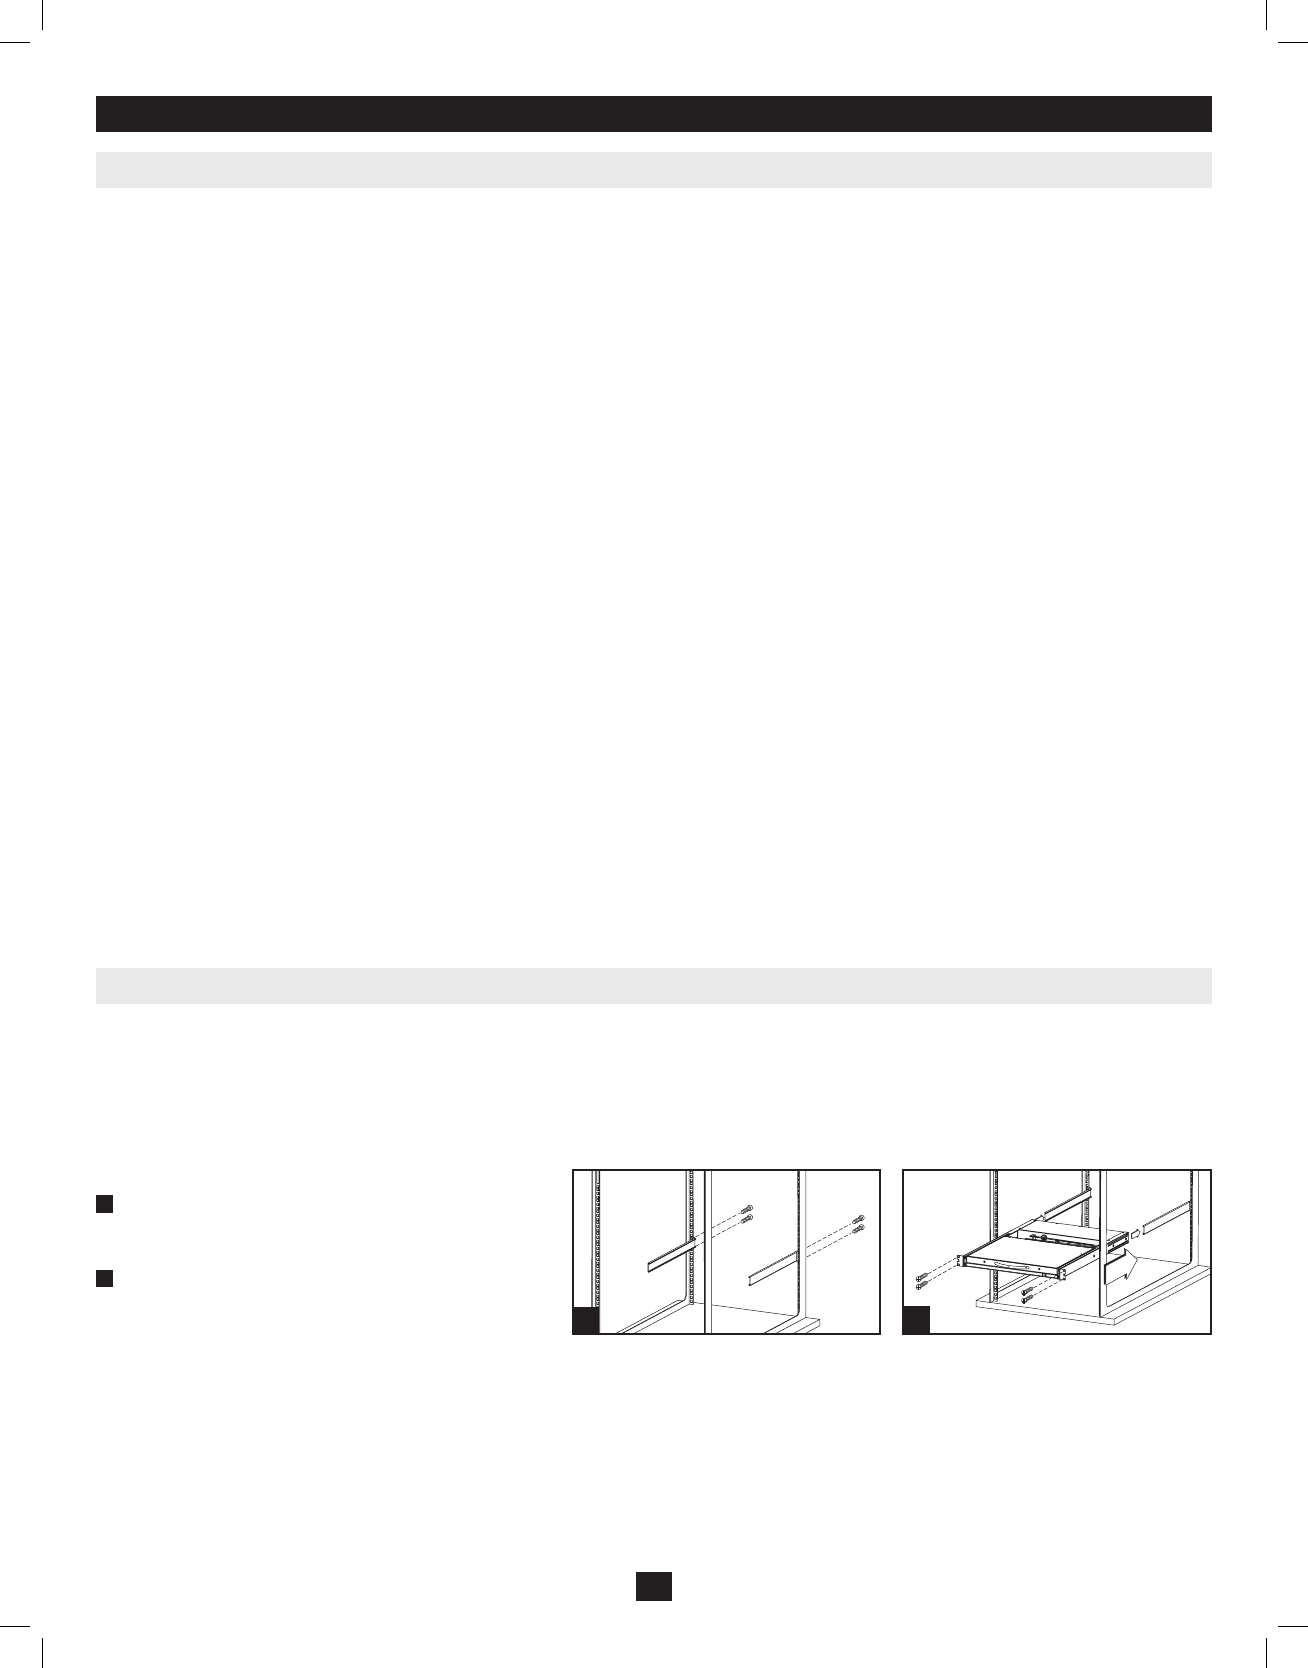
Standard Rackmounting
1
Slideouttherearmountingbracketsfromtheconsoleand
mountbothbrackets(separatefromtheconsole)totheinside
rearofastandard1Uracksystemusinguser-suppliedscrews.
2
Taketheconsoleandgentlyslideitintothetworear-mounted
bracketsintherackandsecuretheconsoleinplaceby
insertinguser-suppliedscrews.
2-Post Rackmounting
TheNetDirectorConsoleKVMSwitchcanalsobemountedina2-postrackinstallationusingtheoptional2-PostRackmountKit(model:B019-000).The
mountinghardwareallowsfortheconsoletobeopenedwiththedrawerinanyposition.Heavy-duty14-gaugesteelprovidesstabilityandpreventstheconsole
framefromtwisting.SeetheB019-000instructionalmanualfordetailedmountinginstructions.
4.2 Rackmounting Instructions for Console KVMs
7
1
2
201011080 • 932900-EN.indd 7 11/29/2010 4:30:12 PM


