


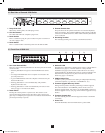
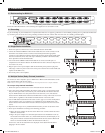
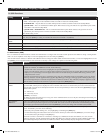
1. Port Push-Buttons/LEDs
Thereare16portselectionpush-buttonsonthefrontpanel,allofwhich
containanLED.
• Pressthepush-buttonofanyporttoswitchtheKVM’sfocustothat
port.
• AnorangeLEDilluminateswhenacomputerisconnectedtothe
portandpowered-on.
• AgreenLEDilluminateswhenthecomputerconnectedtotheport
hastheKVM’sfocus
• Pressingpush-buttons1and2simultaneouslywillperforma
keyboardandmousereset.
• Pressingpush-buttons15and16simultaneouslywillstartanAuto
Scan(seepage12forAutoScandetails).
2. Reset Switch
Pressingthisswitchperformsasystemreset.Thisswitchissemi-
recessedandmustbepushedwithathinobject,suchastheendofa
papercliporaballpointpen. LightsturnontoindicatethattheKVMis
poweredupandreadytooperate.
3. Station ID LED
TheB022-U16’sStationIDisdisplayedhere.IfthisisaSingleStation
Installation(seepage8),orthefirststationonadaisy-chained
installation(seepage8),theunithasaStationIDof01.Onadaisy-
chainedinstallation,theKVMauto-sensesitspositionanddisplaysthe
StationIDthatcorrespondstoitsplaceinthechain(seePort ID
Numbering,page11fordetails).
4. USB Peripheral Port
AUSB1.1portisprovidedforthesharingofUSBperipheralsamong
connectedcomputers(e.g.flashdrive,CD-ROMdrive,etc).
5. Firmware Upgrade Recovery Switch
Duringnormaloperationandwhileperformingafirmwareupgrade,
thisswitchshouldbeintheNORMALposition.Intheeventofa
firmwareupgradefailure,thisswitchissettoRECOVERtoperforma
firmwareupgraderecovery(seepage20forfirmwareupgraderecovery
details).
6. Firmware Upgrade Port
ThecableusedtoperformafirmwareupgradeconnectstotheKVM
switch here.
7. Power LED
ThisLEDilluminateswhentheKVMswitchispoweredON.
3. Introduction
3.3 Front View of B022-U16
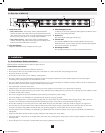
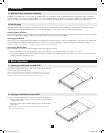
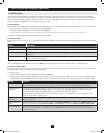
3.2 Rear View of Console KVM Switch
1. Daisy-Chain Port
Whendaisychainingunits,thecableplugsinhere.
2. CPU Port Section
Thecablesthatlinktothecomputerspluginhere.
3. Power Socket
Thisisastandard3-prongACpowersocket.Thepowercordfroman
ACsourceplugsinhere.
4. Power Switch
ThisisastandardrockerswitchthatpowerstheunitONandOFF.
5. External Console Port
Thisportallowsfortheoptionalconnectionofanexternalkeyboard,
mouseandmonitor.TheincludedUSB/PS2ComboConsoleCableKit
connectstotheKVMswitchhere.EitherUSBorPS/2keyboards/mice
canbeconnected.
6. Grounding Terminal
TheincludedgroundingwireconnectstotheKVMswitchhere.
5
1 2
34
1
5 236 4
65 7
201011080 • 932900-EN.indd 5 11/29/2010 4:30:12 PM