


34
3. At the marked positions, drill holes slightly smaller than the screws.
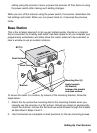
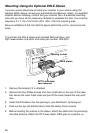
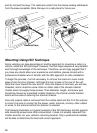
4. Align the bracket with the threaded holes on the sides of the radio case so the
bracket is beneath the radio. Secure the bracket using the two threaded
knobs. Never overtighten the knobs.
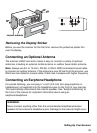
Once the radio is positioned, connect it to a source of AC power using the supplied
13.8V, 750 mA AC adapter. Insert the barrel of the AC adapter to the jack on the
rear, upper right side of the radio marked
.
Insert the connector of the supplied indoor telescoping antenna to the BNC
Antenna Connector and apply moderate pressure to secure it.
Setting Up an Audio Recording Device or Computer
Recording
It is best if you plan ahead when you initiate the basic setup of the scanner if you
include the components to record incoming reception. You need an audio
recording device which can be controlled by a Voice Operated module (VOX)
either externally or from within the unit and the correct connecting cable.
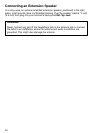
The REC (record) jack on the rear apron provides a constant-level audio output
which is not affected by the setting of the volume control. Use a mono or stereo
cable that ends in a 3.5mm plug for the scanner. The recorder might have its own
requirements as to the proper plug. Check the recorder’s instructions to be sure.
Connect the cable to an external or internal VOX control so that the recorder
operates when audio is present.
You can also connect the cable to the appropriate input jack on your PC so that
with controlling software, you can record to your hard disc.
In order for the function to operate, you must set the channel to record. You must
also set the system’s record option to either All Channel, which will record all
channels regardless of any channel’s setting, or Marked Channel which only lets
recording occur if you have selected record for that channel. Which you choose
will depend on various factors.
WARNING!
Use only the Uniden-supplied AC adapter with this scanner.