


Chapter 16 Virtual Servers
ZyWALL USG 100/200 Series User’s Guide
313
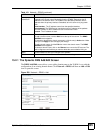
16.3 NAT 1:1 and NAT Loopback Examples
The following sections provide examples of manually configuring NAT 1:1 mapping and a
policy route rule for NAT loopback. These are provided for your reference, you can select
options in the Virtual Server Add/Edit screen to have the ZyWALL automatically configure
these for you instead of configuring them manually.
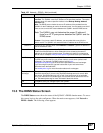
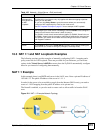
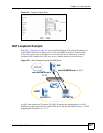
NAT 1:1 Example
In this example, there is an SMTP mail server in the LAN1 zone. It has a private IP address of
192.168.1.21. The public IP address of the server is 1.1.1.1.
In order for the server to be accessible to people from the Internet (WAN zone), you need to
create a 1:1 NAT mapping from the public IP address to its private one.
The firewall is enabled, so you also need to create a rule to allow traffic in from the WAN
zone.
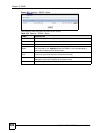
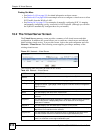
Figure 214 NAT 1:1 Example Network Topology
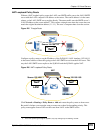
Add
corresponding
Policy Route rule
for NAT
Loopback.
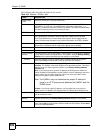
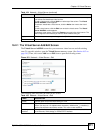
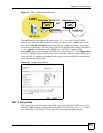
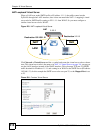
Select this to allow local users to use a domain name to access this virtual server.
By default this virtual server entry only applies this address mapping to packets
coming in from the WAN.
Or you can click Policy Route to go to the screens where you can manually
configure a NAT loopback policy route for this virtual server.
See NAT Loopback Example on page 317 for an example of NAT loopback.
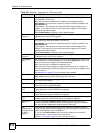
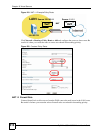
Firewall By default the firewall blocks incoming connections from external addresses. After
you configure your virtual server rule settings, click the Firewall link to configure a
firewall rule to allow the virtual server’s traffic to come in.
The ZyWALL checks virtual servers before it applies To-ZyWALL firewall rules, so
To-ZyWALL firewall rules do not apply to traffic that is forwarded by virtual servers.
The ZyWALL still checks other firewall rules according to the source IP address
and mapped IP address.
OK Click OK to save your changes back to the ZyWALL.
Cancel Click Cancel to return to the Virtual Server summary screen without creating the
virtual server (if it is new) or saving any changes (if it already exists).
Table 105 Network > Virtual Server > Edit (continued)
LABEL DESCRIPTION
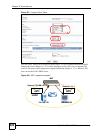
192.168.1.21
1.1.1.1
LAN1