


Chapter 33 Anti-Spam
ZyWALL USG 100/200 Series User’s Guide
565
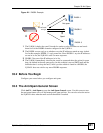
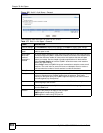
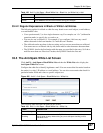
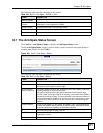
Figure 424 Anti-X > Anti-Spam > Black/White List > Black List
The following table describes the labels in this screen.
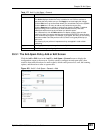
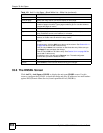
33.4.1 The Anti-Spam Black or White List Add/Edit Screen
In the anti-spam Black List or White List screen, click the Add icon or an Edit icon to
display the following screen.
Table 179 Anti-X > Anti-Spam > Black/White List > Black List
LABEL DESCRIPTION
General Settings
Enable Black List
Checking
Select this check box to have the ZyWALL treat e-mail that matches (an active)
black list entry as spam.
Black List Spam Tag Enter a message or label (up to 15 ASCII characters) to add to the mail subject
of e-mails that match the ZyWALL’s spam black list.
Total Rule This is the number of entries configured.
rules per page Select how many entries you want to display on each page.
Page x of x This is the number of the page of entries currently displayed and the total
number of pages of entries. Type a page number to go to or use the arrows to
navigate the pages of entries.
# This is the entry’s index number in the list.
Type This field displays whether the entry is based on the e-mail’s subject, source or
relay IP address, source e-mail address, or header.
Content This field displays the subject content, source or relay IP address, source e-mail
address, or header value for which the entry checks.
Add icon This column provides icons to add, activate / deactivate, edit, and remove
entries.
To add an entry, click the Add icon at the top of the column.
Click an entry’s Active icon to activate or deactivate the entry. Make sure you
click Apply to save and apply the change.
Click an entry’s Edit icon to edit the entry.
To delete an entry, click the entry’s Remove icon. The web configurator
confirms that you want to delete the entry.
Apply Click Apply to save your changes back to the ZyWALL.
Reset Click Reset to begin configuring this screen afresh.