


Preparing the Site 2-3
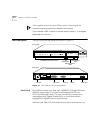
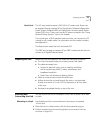
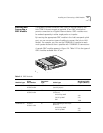
Rear Panel The AC input socket accepts a 100–240 V AC power cord. Power can
be supplied through optional 3Com SuperStack II Advanced Redundant
Power System (Advanced RPS) and SuperStack II Uninterruptible Power
System (UPS) units. These units use the DC power connector. See “Using
Optional Power Systems” later in this chapter.
The console port, a DB-9 standard male connector, can connect to a PC
through a null modem cable. For information on the console functions,
see Appendix A.
The Reset button resets the hub’s on-board CPU.
The GBIC port accepts an optional 3Com GBIC module that lets the hub
connect to a Gigabit Ethernet device.
Preparing the Site Make sure that the installation site meets the following conditions:
■ The hub is accessible and you can easily connect the cables.
■ The cables are away from:
■ Sources of electrical noise, such as: heating, ventilation,
and air conditioning (HVAC); radios; transmitters; and
broadband amplifiers
■ Power lines and fluorescent lighting fixtures
■ Water or moisture cannot enter the hub’s case.
■ Airflow around the unit and through the vents is not restricted.
Provide a minimum of 1-inch (2.5-cm) clearance on all four sides
of the unit.
■ No objects are placed directly on top of the unit.
Installing and
Connecting the Hub
You can mount the hub in a standard 19-inch rack or place it on a desk
or table.
Mounting in a Rack Two brackets and four screws allow rack mounting in a standard
19-inch rack.
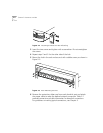
1 Place the hub on a level surface, with the front panel facing you.
2 Position a bracket over the mounting holes on one side of the hub,
as shown in Figure 2-2.