


A-10 APPENDIX A: USING THE CONSOLE PORT
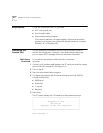
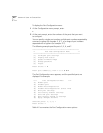
Because option 7 has been selected, the settings will persist after a
hub reset.
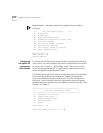
**** Port Configuration Menu ****
(1) Enable port
(2) Disable port
(3) Enable Auto-Negotiation
(4) Disable Auto-Negotiation (Force link)
(5) Show port settings
(6) Use factory default settings
(7) Save new port settings
(8) Exit without change to settings
(9) Apply changes and exit
Selected ports: 1
Enter choice -> 9
Changes applied
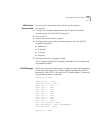
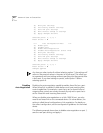
Configuring
the Uplink for
Asymmetric
Flow Control
The uplink (port 9) defaults to symmetric (both outgoing and incoming)
flow control. You must configure the uplink for asymmetric flow control
to connect it to a server or 10/100 Mbps switch. The server or switch
must have the appropriate NIC or uplink device, support flow control,
and be configured to receive pause frames.
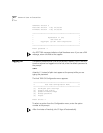
The following example shows how to configure the uplink for asymmetric
flow control by disabling auto-negotiation, enabling outgoing flow
control, and disabling incoming flow control. With this configuration,
the uplink is set to forced link and can send pause frames but ignores
pause frames that it receives. (For more details on flow control, see “Flow
Control” in Chapter 1.)
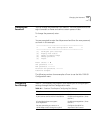
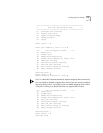
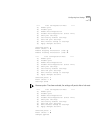
***************************************************
** Hub 1000 Configuration Menu **
***************************************************
[1] Configure port settings
[2] Display hub status
[3] Update firmware image
[4] Change password
[5] Logout
Enter choice -> 1
Enter port number(s), from 1 to 9: 9