


2-2 CHAPTER 2: INSTALLING THE FMS 100-TX HUB
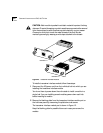
If you ordered one or more transceiver interface modules, they will be
packaged separately from the hub.
Positioning the
Hub
When deciding where to place the hub, make sure the environment meets
the following conditions:
■ The hub is accessible and cables can be connected easily.
For help in planning your network configuration and the location of the
hub, refer to Chapters 3 and 4 for information on connecting the hub to the
network and the required cabling types and lengths. Read this material
before locating the hub permanently.
■ Cabling is away from:
■ Sources of electrical noise, such as HVAC, radios, transmitters, and
broadband amplifiers
■ Power lines and fluorescent lighting fixtures
■ Water or moisture cannot enter the hub’s case.
■ Airflow around the unit and through the vents is not restricted. Provide a
minimum of 1 inch (2.5 cm) clearance on all four sides of the unit.
■ No objects are placed directly on top of any stack or unit other than
another stackable device.
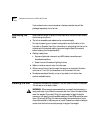
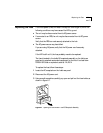
Installing the Hub This section discusses hub installation. You can install the hub in a standard
19-inch rack or on a desk or table.
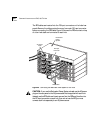
WARNING: 3Com strongly recommends that you install the hub stack in a
rack, particularly if you intend to use more than four hubs in the stack. Since
each hub weighs 12 pounds (5.5 kg), the total weight of eight hubs (the
maximum hub stack), plus the possible addition of two RPSs, would be more
than 100 pounds (45.5 kg). For maximum safety, this combination of units
should be installed in the lower part of a rack. If placed on a desk or table, be
certain that the furniture is sturdy enough to support the weight.