


32 8E6 TECHNOLOGIES, ENTERPRISE REPORTER 3.0 USER’S GUIDE
ADMINISTRATOR SECTION: CHAPTER 2 - CONFIGURING THE ER 3.0 SERVER
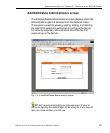
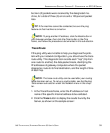
Set up/Edit IP Addresses
TIP: In order for the Server to effectively communicate with
your system, be sure all fields contain accurate information
before saving your settings.
1. Enter or edit an IP address in each appropriate field:
• In the Host Name field, enter the address or URL that will
be used for accessing the Administrator GUI. This entry
should include the full, qualified domain name, and the
“host” name for the box (i.e. reporter.myserver.com).
• In the LAN 1 IP field, enter the IP address of the ER 3.0
Server on your Local Area Network (LAN 1).
• In the Netmask field, enter the netmask that will define
the traffic designated for the LAN.
• In the Gateway IP field, enter the IP address for the
default router that will be the main gateway for the entire
network segment.
• In the First DNS IP field, enter the IP address of the
primary Domain Name System (name server). The
Server box will use this IP address to identify other IP
addresses on the system, including its own IP address.
• In the Second DNS IP field, enter the IP address of the
fallback DNS.
2. Be sure each IP address is correct, and then click Save.
NOTE: After appropriate entries have been made in these
fields and saved, you must restart the Server to activate the IPs.
To restart the Server, select the Restart Hardware option on the
Shut Down screen. (See the Shut Down sub-section under the
Server menu section in this chapter.)