


661 Brea Canyon Rd., Suite 3
Walnut, CA 91789
tel: 909.598.7388, fax: 909.598.0218
© Copyright 2005 Acnodes, Inc.
All rights reserved. Product description and product specifications
are subject to change without notice. For latest product information,
please visit Acnodes’ web site at www.acnodes.com.
RMC 7132
1U Rackmount System
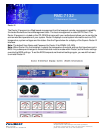
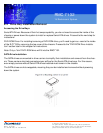
SATA Power Cables
SATA power cables should be routed so that they do not block the airflow through the chassis. See the
serverboard layout diagram for the location of the cable con- nections.
DVD-ROM Drive Installation
The top cover of the chassis must be opened to gain full access to the DVD-ROM drive bay. The DVD-
ROM drive must have a "slim" profile to fit into the RMC7132.
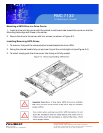
Installing a DVD-ROM Drive
1. Turn off the power to the system and remove the AC power cord.
2. Release the retention screws that secure the unit to the rack.
3. Grasp the two handles on either side and pull the unit straight out until it locks (you will hear a
"click").
4. Depress the two buttons on the top of the chassis to release the top cover and at the same time,
push the cover away from you until it stops.
5. Lift the top cover from the chassis to gain full access to the inside of the server.
6. Disconnect the power and data cables from the drive to other chassis compo- nents including the
motherboard and backplane.
7. Remove the old drive by depressing the release tab, then pulling the drive out of the chassis.
8. Insert the new drive unit in the slot until the tab locks into place.
9. Connect the data and power cables to the backplane and motherboard.
10. Replace the chassis cover, reconnect the AC power cord and power up the system.