


29
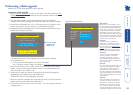
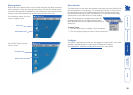
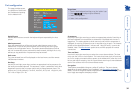
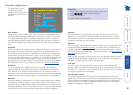
Video settings
This dialog provides access to all of the key video settings that determine image
quality and link performance.
All settings can be individually subjected to an auto conguration (click the
appropriate ‘Auto’ button) and the most can also be manually adjusted.
Use the ‘Calibrate all’ button to automatically determine the optimum settings
for all items.
Note: Before using the Calibrate all option, ensure that there are no on-screen
display elements generated by any connected KVM switch (such as a host name
label or menu). Due to the differing video rates of these items compared to the
video image from the host itself this can confuse the calibration process into
giving a much higher Threshold rate than is necessary, thus slowing the video
response.
Threshold
The threshold
is effectively a
noise lter that
differentiates
between valid
video signals and
background noise
or inteference.
This has the
effect of reducing
unnecessary video
signals between the
AdderLink IP and
the remote system,
thus improving
performance.
Phase
The phase setting
adjusts the alignment
of the host video
output and the remote
system video display to
achieve the sharpest
image.
Horizontal position
Determines the
horizontal position of
the host screen image
within the viewer
window.
Vertical position
Determines the
vertical position
of the host screen
image within the
viewer window.
Colour, brightness &
contrast
Provides an automatic
setting button to
optimise these three
important video
constituents for the
current host and
connection speed.
Calibrate all
Click to
determine the
optimum settings
for all aspects of
video the video
connection from
the host system.
Display activity
Indicates the level
of video activity
currently in
progress.
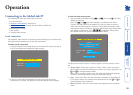
Setting the Threshold manually
Occasionally it can be useful to manually adjust the Threshold setting, such as
when there is a KVM switch OSD banner that cannot be easily removed from the
display.
1 Use the ‘Calibrate all’ function to ensure that all other settings are
optimised.
2 Click the Threshold left arrow button to decrement the setting by one and
observe the Display activity indicator.
3 Repeat step 2 until the Display activity indicator suddenly rises to a much
higher level (i.e. 50%). This will mean that you have reached the noise
boundary. At this point, increment the Threshold value by 2 or 3 points to
achieve an optimum setting.