


A-2 61200290L1-1G
Appendix A, Acceptance Test Procedure MX2800 M13 Multiplexer User Manual
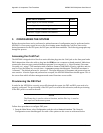
3. CONFIGURING THE SYSTEM
Before the required tests can be performed, a minimal amount of configuration must be performed on the
MX2800. It is necessary to gain access to the Provisioning menus through the Craft Port, then set the
desired parameters for the DS1 ports, the DS3 port, and the alarm attributes. The following paragraphs step
through the process.
Accessing the Craft Port
The MX2800 is shipped with a flat silver-satin cable that plugs into the Craft jack on the front panel and a
DB-9 adapter that allows the cable to plug into the
COM port on a computer or dumb terminal. Make these
connections, then start up a terminal emulation program on a computer (e.g., HyperTerminal, Procomm,
Crosstalk, etc.), using VT100 emulation with a character format of 9600 baud, no parity, eight bits, and one
stop bit. Press the
ENTER key several times. A username prompt should appear. The default username is
“username”. The default password is “password”. The input characters for username and password are not
case sensitive. After the logon and password are accepted, the MX2800
Main Menu should appear. This is
the screen from which all other management and control functions are accessible.
Provisioning the DS3 Port
In order for the MX2800 to correctly pass traffic through the system, the DS3 and DS1 ports need to be
properly configured. The provisioning of the DS3 port is covered in this subsection, and the provisioning
of the DS1 ports is covered in the next.
NOTE
The
ENTER key is used to select a function, and the ESC key is used to
back up a level in the menu system.
Follow these procedures to configure DS3 ports.
1. From the Main Menu, select
Configuration, and then select Network Interface. The Network
Configuration screen should appear. Set each of the options on this screen as referenced below.
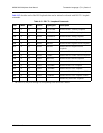
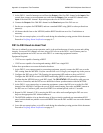
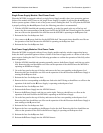
If this card is installed... Check
Power Supply A (far left slot) installed?
Power Supply B (next slot to right) installed
Controller A (lower controller card) installed
Controller A (upper controller card) installed