


AT-GS950/48PS Switch Web Interface User’s Guide
101
Modify a Port Trunk
This procedure explains how to change the status of a port trunk and add
or remove ports from a port trunk.
Caution
Before you disable or modify a port trunk, disconnect all of the
cables from the ports of the trunk. Leaving the cables connected
during the reconfiguration of a trunk can create loops in your
network topology. Loops can result in broadcast storms which can
severely limited the effective bandwidth of your network.
To add or remove ports from a trunk, perform the following procedure:
1. Disconnect all of the Ethernet cables from the ports of the trunk.
2. Select the Bridge folder.
The Bridge folder expands.
3. From the Bridge folder, select the Trunk Config folder.
The Trunk Config folder expands.
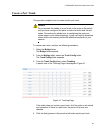
4. From the Trunk Config folder, select Trunking.
The Trunking Page is shown in Figure 31 on page 99.
5. Click the status of the port trunk you want to modify and change the
status to one of the following options:
Disable - Disables the port trunk.
Active - The aggregator will broadcast and respond to LACPDU
(LACP Data Unit) packets. This setting enables the LACP feature.
Passive - The aggregator will not broadcast LACPDU packets, but
it will respond to them. This setting enables the LACP feature.
Manual - Enables static port trunking and disables the LACP
feature.
6. To add or remove a port from a trunk, click the dialog box for the port in
the corresponding trunk row.
A check in a box indicates the port is a member of the trunk. No check
means the port is not a member. A port trunk can contain up to eight
ports.
7. Click Apply.
8. From the main menu on the left side of the page, select Save
Configuration to Flash to permanently save your changes.