


AT-GS950/48PS Switch Web Interface User’s Guide
247
Enable and Disable RMON
You can use your SNMP Network Management System (NMS) software
and the RMON section of the MIB tree to view the RMON statistics, history
and alarms associated with specific ports. Since RMON uses the SNMP
agent for communicating with your NMS software, the SNMP Agent must
be enabled and the SNMP feature must be configured on your switch.
Since RMON works in conjunction with the SNMP agent, the SNMP agent
must be enabled for the RMON feature to be active. See “User Interface
Configuration” on page 39 for activating SNMP. For instructions on how to
configure SNMP on your switch, refer to Chapter 16, “SNMPv1 and v2c”
on page 189 or Chapter 17, “SNMPv3” on page 201.
Perform the following procedure to activate RMON:
1. From the main menu on the left side of the page, click the RMON
folder.
The RMON folder expands.
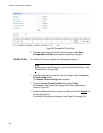
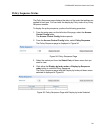
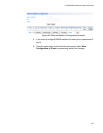
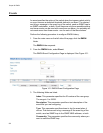
2. From the RMON folder, select Basic Settings.
The RMON Basic Settings Page is displayed. See Figure 96.
Figure 96. RMON Basic Settings Page
3. Select the RMON Status field and select one of the following choices
from the pull-down menu:
Enable: The RMON feature is active.
Disable: The RMON feature is inactive.
Note
Insure the that the SNMP agent is Enabled.
4. Click Apply.
The RMON setting that you have selected is now active.
5. From the main menu on the left side of the page, select Save
Configuration to Flash to permanently save your changes.