


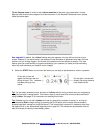
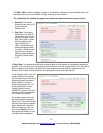
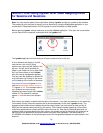


The ROLL CALL screen will appear as below. Your student’s information (from the Roster.txt file you
have placed into your course folder) will begin scrolling as shown below:
The instructions for students to register are outlined on the screen and are easy to follow.
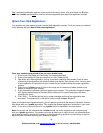
1. Step One: The student
locates his/her name or ID
as read from the
Roster.txt file.
2. Step Two: The student
must wait until his/her ID
has scrolled down into the
central blue region of the
Step Two screen. A letter
will then appear to the
right of his/her ID or
name. The student must
press the displayed letter
on his/her i-clicker remote,
at which point a second
(different) letter appears to
the right of his/her name
or ID.
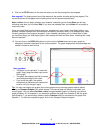
3. Step Three: The student should press the second letter on their keypad to complete the registration
process. This is the final step in tying each individual student to his/her unique remote. Once the second
letter is selected, the boxes to the right of the name disappear and the student is registered for the
duration of the course. His/her name will no longer appear on the scrolling roster list.
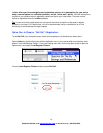
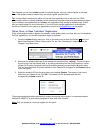
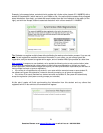
In the example shown here, the
student C Brown has pushed
the first button and is now being
prompted to push the second
button (letter D.) Once the
student has pressed “D,” her
student ID and her i-clicker
remote ID/serial number
(#0028ECF, shown to the left of
her name) will be tied together
for the rest of the course.
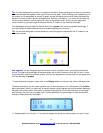
If a student’s name scrolls off
the screen before completing
Steps 2 or 3, s/he should simply
wait for his/her name to appear
again. Names will continue to
scroll on the screen until you
click on the Close button (on
the bottom right screen) or until
all students have registered.
15
Questions? Contact us at support@iclicker.com or call toll-free at 1-866-209-5698.