


Section One-Using i>clicker: How to Poll Your Students in Class
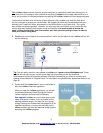
1. Connect the i-clicker receiver (or base) to your computer through the USB port. The LCD screen on
the receiver will light up. If it doesn’t, be sure to plug the receiver directly into the computer (and not
through the keyboard or a non-powered USB hub). Your computer should tell you that it has
recognized new hardware and inform you when it is ready to use it (this takes a few seconds).
2. Place your i-clicker flash drive (a.k.a. memory stick or thumb drive) in the USB slot on the back of the
receiver. (Your flash drive should arrive with your shipment of the i-clicker receiver.)
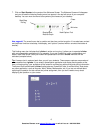
3. Locate the flash drive on the Desktop, and double-click on it (often called SanDisk256). The flash
drive will contain folders called MyCoursePC and MyCourseMac. These folders contain course
templates and application software for PC and Mac users respectively.
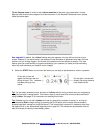
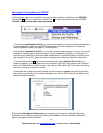
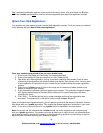
Note: You can also download the software from the downloads section of the i-clicker web site. If
you use both Windows and Mac computers, you will need to download the zipped files MyCoursePC and
MyCourseMac from the Web site. To download the software, click the Mac Software link and save the file
to your hard drive in an easy-to-remember location. The files will be compressed, in an archive (.ZIP)
format. Double click the icon to un-archive the files. When this process is complete, the uncompressed
files will be displayed with a folder icon like the one shown below, on the right. This folder can be
dragged or copied to the flash drive or to the location where you will run the i-clicker program (see Step 5
and Tip below).
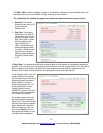
4. The “MyCourse” folders contain course templates and application software for PC and Mac users
respectively. You will need to make a copy of the MyCourseMac folder for each class or section for
which you are using i-clicker and rename each new folder with the name (or section) of the course.
Do not delete, rename, or modify the MyCoursePC or MyCourseMac folders – these are templates
that you will need when you create more courses.
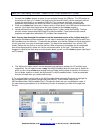
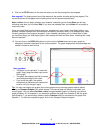
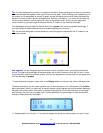
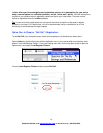
5. To copy the folders, control-click on the MyCourseMac folder and select Duplicate (or highlight the
MyCourseMac folder, hold down the Apple key and press D). This will make a copy of the
MyCourseMac folder (“MyCourseMac Copy”). Rename the folder with your course/section name. If
you were teaching two sections of an Introductory Course, for example, your flash drive might look
like this:
4
Questions? Contact us at support@iclicker.com or call toll-free at 1-866-209-5698.