


Page 1-14
Chapter 1 — Quick Start
❏ At least one device configured for connection to your
Ethernet. We recommend that you use a Macintosh or
PC with AsantéView 2.2 network management software
installed, although you can use any device that normally
connects to and communicates over your Ethernet net-
work.
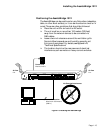
❏ An RJ45 extension cable to connect your network
device to the AsantéBridge 1012.
Tools
You need the appropriate tools for attaching BNC connectors to
Ethernet coaxial cable, and a small Phillips screwdriver to con-
nect the MAUs.
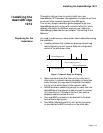
Installing your AsantéBridge 1012 is a simple five step procedure:
❏ Unpack your AsantéBridge
❏ Physically position the unit, either on a desktop or with
a wall or rack mount
❏ Turn on the unit and pretest it
❏ Connect two network segments
❏ Connect two or more network devices to the bridge
Unpacking the AsantéBridge 1012
Your AsantéHub package includes:
❏ The AsantéBridge 1012
❏ AC power cable
❏ Two (2) mounting brackets and four (4) screws for rack-
or wall-mounting
❏ Four (4) self-adhesive feet for desk-mounting
❏ AMS Link Extender cables for PC and Macintosh
❏ This installation guide
❏ The Asanté Introduction to Networking Manual
❏ Warranty card
Please mail in the warranty card today. This guarantees that you
will receive notification of any future software or hardware
releases.
Basic Installation
Procedures