


Page 40
AsantéHub 2072 Network Management Module Installation Guide
3
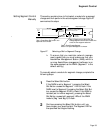
Press the Change Segment button repeatedly until you
have chosen the segment you want: Seg 1, Seg 2, or
neither.
4
When you have chosen your segment, press both the
Select Slot and Change Segment buttons together. In
approximately two to three seconds, the change is
made and the specified segment’s LED lights; the
unspecified segment’s LED darkens. (See Figure 27 on
page 39.)
∆ Network statistics cannot be collected if a mod-
ule is isolated from both segments.
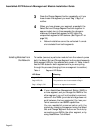
Isolating Modules from
the Network
To isolate (remove) a particular module from the network, press
both the Select Slot and Change Segment buttons simultaneously.
Both segment LEDs for the selected slot remain lit. Table 4 identi-
fies the LED states for both segments while you are cycling
through the process (changing from one segment to another).
Table 4 Segment LED States
▲ If your AsantéView Management Station (AMS) is
on one segment, and you change the NMM to the
other segment, you will not be able to communi-
cate with the NMM (provided a bridge does not
exist between the two segments). You lose your
Telnet connection and SNMP capabilities.
You can reestablish communication with the
module by changing the segment using the Select
Slot and Change Segment buttons on the hub, by
connecting your AMS to the other segment, or by
using AsantéView Out-of-Band.
LED State Meaning
Seg 1 LED, On This particular slot is connected to Seg 1.
Seg 2 LED, On This particular slot is connected to Seg 2.
Seg 1 & Seg 2, Off There is no segment connection.