


27
CHAPTER 6: Installation
6.2.4 A
TTACHING A
S
ERV
S
WITCH
F
AMILY
KVM S
WITCH TO THE
R
EMOTE
U
NIT OR TO THE
D
UAL
-A
CCESS
L
OCAL
U
NIT
’
S
U
SER
P
ORTS
The way you’ll do this will depend on what kind of CPU ports the Switch has:
multiple connectors (see Section 6.2.4.A), single connectors compatible with the
Local Unit’s (see Section 6.2.4.B), or single connectors that aren’t compatible with
the Local Unit’s (see Section 6.2.4.C). (Refer to the listings in Section 4.2.4 for
which switch models are in which category.)
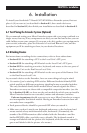
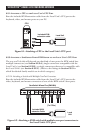
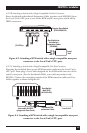
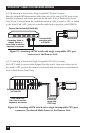
6.2.4.A Attaching a Switch with Multiple CPU-Port Connectors
Run extension cabling from the monitor, keyboard, and mouse connectors on the
Remote Unit or Dual-Access Local Unit to the matching CPU-port connectors on
the KVM switch. This extension cabling can be individual keyboard-, video-, and
mouse-extension cables (product codes EVMPS03-MM for keyboard and mouse,
EVNPS05-MM for video), but we recommend our specially bonded three-to-three
CPU-extension cable (product code EHN408):
• If you’re using individual extension cables, run the video-extension cable
between the two video/monitor ports, the keyboard-extension cable between
the two keyboard ports, and the mouse-extension cable between the two
mouse ports.
• If you’re using one of our three-to-three bonded extension cables, run the
cable’s video strand between the two video/monitor ports, the cable’s
keyboard strand between the two keyboard ports, and the cable’s mouse strand
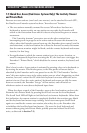
between the two mouse ports, as shown in Figure 6-6.
Figure 6-6. Attaching a KVM switch with multiple CPU-port connectors to
the Remote Unit.
ServSwitch Wizard Pro (SW644A)
EHN408
(To master Switch or
monitor, keyboard,
and mouse)
Remote Unit