


60
SmartStack STS16-20D/STS16-20R Token Ring Switches Installation and User Guide Installation
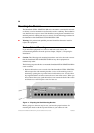
Cabling
➽ Note:
For information on connectors, buttons, slots, and LEDs, please see “Front
Panel Details” on page 5 and “Back Panel Details” on page 9 in Chapter 1.
This section provides instructions for connecting devices (such as hubs, servers,
personal computers, and workstations) to the SmartStack STS16-20D/STS16-20R.
Remember these tips when connecting cables:
•
Avoid stretching or bending the cables excessively.
•
Avoid routing the cables near potential sources of electromagnetic
interference, such as motorized devices and fluorescent lights.
•
Avoid trip hazards by routing the cables away from aisles and other areas
where people walk. If such routes cannot be avoided, use floor cable covers or
similar material to secure and protect the cables.
•
Be sure that the cables connected to the switch are supported so that the cable
connectors are not excessively strained.
•
Use a Category 3 or better UTP cable or a 150 ohm, STP or STP-A cable with
an impedance-matching balun at each end.
See Appendix B, “Cable and Pin Information” for specific information on
supported cable types, cable lengths and connector pinouts.
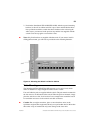
Connecting Devices to the Token Ring Ports
If you will not be using building wiring (in-the-wall cables) to connect the device
to the SmartStack STS16-20D/STS16-20R, perform the following steps. If you will
be using building wiring, follow the steps beginning with step 1 on page 61.
Follow these steps to connect one or more devices to the Token Ring ports on the
switch:
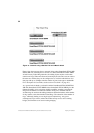
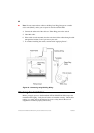
1. Using the SmartStack STS16-20D/STS16-20R Cabling Chart provided by your
network administrator as a guide, connect the cables between the switch and
other devices as illustrated in Figure 19. Note that the figure illustrates an RJ-
45 connector on each end. Depending on the cable type you use, the device end
of the cable may also have a 9-pin D-shell or 150 ohm Data Connector.
2. If the switch is rack-mounted, dress the switch end of the cables through a cable
management bracket, if one is present on your rack.
3. Label each end of the cables so that it will be easy to find the device if you have
to troubleshoot a network problem.
Suggested information to place on the label includes the room location of the