


6-3
Using the Fax Functions
Fax Settings
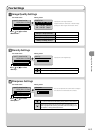
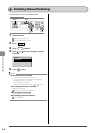
Image Quality Settings
Fax mode screen Setting screen
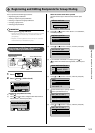
Resolution
200 x 100 dpi (Normal
200 x 200 dpi (Fine)
200 x 200 dpi (Photo)
200 x 400 dpi (Super
...
Specify destination.
01/01/2011 12:52AM
RX Mode: Auto
Resolution: 200 x 10
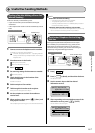
Density Settings
Fax mode screen Setting screen
Specify destination.
01/01/2011 12:52AM
Resolution: 200 x 1
...
Density: 0
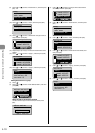
Density
- +
+
-
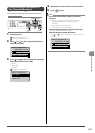
Sharpness Settings
Fax mode screen Setting screen
Specify destination.
01/01/2011 12:52AM
Density: 0
Sharpness: 0
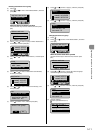
Sharpness
- +
+
-
+
-
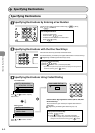
Specify the scanning resolution.
Higher resolutions will result in better image
quality, but also longer transmission times.
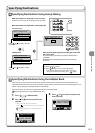
Specify the scanning density.
You can emphasize the outline of the image in
the document or decrease the contrast.
Press [ ] or [ ] to select
<Sharpness>.
<200 dpi x 100 dpi (Normal)>
For text documents
<200 dpi x 200 dpi (Fine)>
For fine text documents
<200 dpi x 400 dpi (Superfine)>
For fine text documents
<200 dpi x 200 dpi (Photo)>
For documents that contain photographs
[ ]
Makes the scanning density lighter.
[ ]
Makes the scanning density darker.
[ ]
If you want to clearly scan halftone images adjust the sharpness to
<->. This can reduce the moire effect (patchy patterns called “moire”).
[ ]
If you want to clearly scan text or lines, adjust the sharpness to <+>.
This is appropriate for scanning documents with fine markings, such
as blueprint or thinly penciled documents.
Press [ ] or [ ] to select
<Resolution>.
Press [
] or [ ] to select
<Density>.