


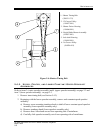


P35GPS Dual Lens Turret Projector
CHRISTIE DIGITAL SYSTEMS P35GPS Projector 5-2
March, 2004
5.3. CLEANING
Projector should be kept clean at all times
.
1. Remove dust and foreign matter from projector and assemblies. Use soft, lint-free cloth, or
spray with compressed air at force no greater than 20 psi.
2. Using camelhair brush or toothbrush, remove dust and foreign matter from pad rollers,
sprockets, Ultramittent shoe closure, and sound idler rollers, and from pads and shoes in trap
and gate assembly.
3. Using cotton-tip swabs, remove dirt and dust from sound-head optics.
4. Lightly oil lateral guide rollers and springs with very fine machine oil. Inner flange of lateral
guide should move easily and should spring back to rest position without sticking.
Do not adjust lateral guides without proper alignment tool (SK1994-3).
5.4. REMOVAL OF ASSEMBLIES
The following sections contain instructions and procedures necessary to remove assemblies
and components from the projector. Use only the specified tools to perform these
procedures. The use of any other tools will cause damage to the assemblies and components.
Appendix A contains a list of replaceable assemblies and components and their part numbers.
Removal and replacement of the assemblies discussed in Sections 5.4.1 through 5.4.13 may
be performed by the customer. The customer may also repair broken leads, solder
connections, and repair timing belts. All other repairs and replacements are to be performed
only by an authorized service representative. In general, any problem that does not appear to
be treatable by a minor procedure should be treated by removing the defective assembly and
returning it to
CHRISTIE for repair.
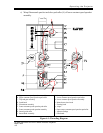
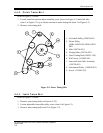
5.4.1. REMOVAL OF THE T RAP AND GATE ASSEMBLY
Refer to item 6 on page 2-2
1. Open trap and gate assembly by pulling catch knob (item 56 in Figure B-2).
2. Remove two socket head cap screws (item 39 in Figure B-2) securing assembly to
3. Remove assembly by gently pulling free from locating pins.
4. For projectors equipped with automatic turret, slide aperture carrier dovetail out of
plunger connector.