


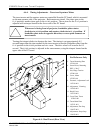


P35GPS Dual Lens Turret Projector
CHRISTIE DIGITAL SYSTEMS P35GPS Projector 6-6
March, 2004
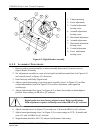
6.4.3. OUTER T IMING BELT
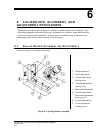
Refer to Figure 5-2 on page 5-3.
1. Loosen outer belt tension adjust assembly locking screw (item 6 in Figure 5-2).
2. Adjust outer timing belt tension assembly by turning bolt (item 8 in Figure 5-2) until belt
deflection of 0.25 inch is obtained. Belt should be just tight enough to prevent slapping.
3. Tighten screw (item 6 in Figure 5-2).
Shutter timing belt must be tensioned before outer timing belt is
tensioned.
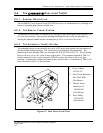
6.5. SHUTTER TIMING
Refer to Figure 5-4 on page 5-5.
1. Loosen shutter clamp screws (item 8 in Figure 5-4) just enough that shutter can be
rotated on its shaft.
2. Turn projector by hand with manual turndown knob until Ultramittent sprocket is in top
position. Sprocket should not move while turndown knob is being turned.
3. Use sharp pencil. Carefully rest pencil point on Ultramittent casting, pointing to one
sprocket tooth.
4. Without moving pencil, turn projector by hand with manual turndown knob until pencil is
pointing at third tooth from starting tooth of Ultramittent sprocket.
Hold manual turndown knob to ensure that projector does not turn
over while rotating shutter.
5. Rotate shutter (item 9 in Figure 5-4) by hand until crosshairs are centered in aperture.
Make certain shutter is not hitting anything.
6. Tighten shutter clamp screws (item 8 in Figure 5-4). Do not allow shutter to move on its
shaft after centering crosshairs.
7. Recheck shutter timing.
CHRISTIE recommends that shutter timing also be checked whenever
inner, outer or shutter timing belts have been removed or replaced.