


Getting Started with the WRVS4400N Router
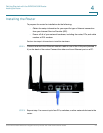
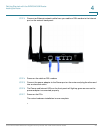
Configuring the Router
Cisco WRVS4400N Wireless-N Gigabit Security Router with VPN Administration Guide 26
4
Configuring the Router
To configure the WRVS4400N router, plug a PC into the router and launch the web-
based configuration utility as follows.
NOTE Before setting up the router, make sure your PCs are configured to obtain an IP (or
TCP/IP) address automatically from the router.
STEP 1 Launch a web browser, such as Internet Explorer or Mozilla Firefox.
STEP 2 In the Address field enter http://192.168.1.1 and press Enter.
STEP 3 In the User Name and Password fields, enter admin.
The default user name and password is admin.
STEP 4 Click OK.
For added security, you should later set a new password using the Administration
> Management window of the web-based utility.
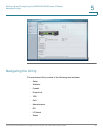
STEP 5 The web-based utility will appear with the Setup menu and Summary selected.
Click WAN under the Setup menu.
STEP 6 If requested by your ISP (usually cable ISPs), complete the Host Name and Domain
Name fields, and the MTU and MTU Size fields. Otherwise, leave the defaults.
STEP 7 In the WAN window, choose an Internet Connection Type from the
drop-down menu. Depending on which internet connection type you select,
additional setup may be required.
The Internet Connection Types are:
• Automatic Configuration - DHCP: If you are connecting through DHCP or a
dynamic IP address from your ISP, keep this default setting.
• Static IP: If your ISP assigns you a static IP address, select Static IP from the
drop-down menu. Complete the Internet IP Address, Subnet Mask, Default
Gateway, and DNS fields. Enter at least one DNS address.
• PPPoE: If you are connecting through PPPoE, select PPPoE from the drop-
down menu. Complete the User Name and Password fields.
• PPTP: PPTP is a service used in Europe only. If you are using a PPTP
connection, check with your ISP for the necessary setup information.