


14. Enter system setup and enable the new expansion card.
If you installed a sound card, perform the following steps:
a. Enter system setup, select Integrated Devices (LegacySelect) and change the setting for Sound to Off.
b. Connect external audio devices to the sound card's connectors. Do not connect external audio devices to the microphone, speaker/headphone,
or line-in connectors on the computer back panel (see "Inside Your Computer").
If you installed an add-in network adapter, perform the following steps:
a. Enter system setup, select Integrated Devices (LegacySelect) and change the setting for Network Interface Card to Off.
b. Connect the network cable to the add-in network adapter's connectors. Do not connect the network cable to the integrated connector on the
computer back panel (see "Inside Your Computer").
15. Install appropriate drivers for the expansion card.
Removing an Expansion Card
1. Turn off the computer and devices, disconnect them from their electrical outlets, and wait 10 to 20 seconds.
2. Open the computer cover.
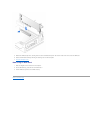
3. Press the lever on the expansion card retention arm and raise the retention arm (see the expansion card retention arm illustration for your computer).
4. If necessary, disconnect any cables connected to the card.
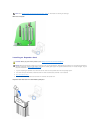
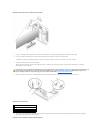
5. Grasp the card by its top corners, and ease it out of its connector.
6. If you are removing the card permanently, install a filler bracket in the empty card-slot opening.
If you need a filler bracket, contact Dell.
7. Lower the expansion card retention arm and press it into place, securing the expansion card(s) in the computer.
8. Close the computer cover.
9. Reconnect the computer and devices to their electrical outlets, and turn them on.
10. Uninstall the expansion card driver from the operating system.
11. Enter system setup and disable the expansion card.
If you removed a sound card, perform the following steps:
a. Enter system setup, select Integrated Devices, and change the setting for Sound to On.
b. Connect external audio devices to the audio connectors on the computer back panel (see "Inside Your Computer").
If you removed an add-in network adapter, perform the following steps:
a. Enter system setup, select Integrated Devices (LegacySelect) and change the setting for Network Interface Card to On.
b. Connect the network cable to the integrated connector on the computer back panel (see "Inside Your Computer").
Installing an AGP Graphics Card
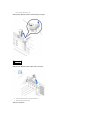
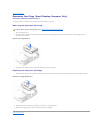
1. Open the computer cover.
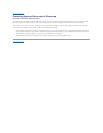
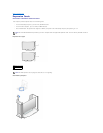
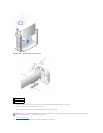
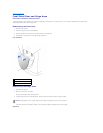
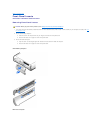
2. Remove the filler bracket by raising the hinged lever and sliding the bracket up.
On the small desktop computer, press the indentation with your thumb at an angle toward the system board until you release the tab. Continue holding
NOTE: If enabled, the Chassis Intrusion option will cause the following message to be displayed at the next computer start-up: Alert! Cover was
previously removed. Reset the chassis intrusion detector.
CAUTION: Before you perform this procedure, see "Safety First—For You and Your Computer."
NOTICE: Before disconnecting a device from the computer, wait 10 to 20 seconds after disconnecting the computer from its electrical outlet. Before
removing a component from the system board, verify that the standby power light on the system board has turned off. To locate this light, see your
computer's illustration in "System Board Components."
NOTE: Installing filler brackets over empty card- slot openings is necessary to maintain FCC certification of the computer. The brackets also keep dust
and dirt out of your computer.
NOTE: If enabled, the Chassis Intrusion option will cause the following message to be displayed at the next computer start-up: ALERT! Cover was
previously removed. Reset the chassis intrusion detector.
NOTE: The small desktop computer supports low- profile AGP cards.