


Configuring the Cluster Software 3-5
Updating the NIC Driver
Dell recommends that you use Windows NT NIC driver
version 2.22 or later for the Intel Pro100B network con-
troller. Perform the following procedure on both cluster
nodes to update the NIC driver:
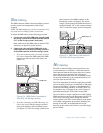
1. Go to the Control Panel, double-click the Net-
work icon, and click on the Adapters tab.
2. Highlight one of the adapters and click Update.
3. In the dialog box, type A:. Place the diskette con-
taining the updated Intel Pro100B driver into
drive A and press <Enter>.
Windows NT installs the NIC driver.
4. When the driver has been installed, click Close to
exit the Network dialog box.
Adjusting the Paging File Size and
Registry Sizes
To enable adequate system resources for clustering, it is
recommended that you increase the paging file and regis-
try file sizes on the cluster nodes. Set the paging file size
to at least twice the capacity of the system RAM, up to
256 megabytes (MB). For systems with RAM capacities
over 256 MB, set the paging file size at or above the
capacity of the RAM up to the available free space on
your hard-disk drive. Set the registry file size to at least
64 MB. These adjustments can be made prior to applying
the current Windows NT Service Pack.
Use the following procedure to make the paging file and
registry size adjustments on each cluster node:
1. Go to Control Panel, double-click the System
icon, and click the Performance tab to see the
System Properties dialog box. In the Virtual
Memory group box, click Change.
2. In the dialog box, set the Paging File maximum
size to 256 MB. Set the Registry File size to 64 MB
and click OK.
3. When asked to restart the system, click No.
4. Apply the current Service Pack for Windows NT
Server Enterprise Edition.
V
erifying the Cluster
Functionality
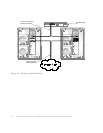
To ensure that the PowerEdge Cluster functions properly,
you should perform a series of checks of the system’s
operation and configuration. These checks should be per-
formed to verify that the cluster meets the following
conditions:
•
Each SDS 100 storage system is running in 1 x 8
mode.
•
The controller IDs on each shared bus are different.
•
All cluster servers and clients are able to log on to
the same domain.
•
The cluster-specific driver for the RAID controller is
installed on both cluster nodes.
•
The shared disks are assigned identical drive letters
in both cluster nodes.
•
All IP addresses and network names in the cluster
are communicating with each other and the rest of
the network.
•
The Cluster Service is running.
•
All resources and recovery groups are online.
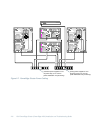
1 x 8 Mode on the SDS 100 Storage
System
To enable clustering, the SDS 100 storage system must
run in 1 x 8 mode when the two RAID controllers are
connected to the system. You can verify that the back-
plane is in 1 x 8 mode by using the RAID controller
BIOS configuration utility. Access the RAID configura-
tion utility by pressing <Ctrl> <m> when prompted
during POST. From the Management Menu, select Con-
figure and then select View/Add Configuration. You
should see the same configuration when viewing from
either cluster node, particularly, the same SCSI ID num-
bers for the hard-disk drives, the same RAID level for the
storage system, the same logical drive configuration, and
so on.
If the storage system appears in 2 x 4 mode, the BIOS
firmware needs to be updated on the SDS 100 storage
system(s). See Appendix A, “Upgrading to a Cluster
Configuration,” for information about updating firmware
on the SDS 100 storage system.