


Running Applications on a Cluster 4-3
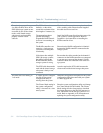
9. Set the Resource Type as File Share. Select both
nodes as possible owners. Set File Share Disk, File
Share IP, and File Share NetName as the depen-
dencies for XYZ Files. Then type the share name
and share path in the Parameters tab.
For example, you can configure y:\groupfiles as
share name xyzfiles.
NOTE: When creating a File Share resource in
Microsoft Cluster Server, do not use “m” as the
share name of the resource. Cluster Server rejects
“m” as a File Share resource name.
After bringing both the resources and the group online,
users can use Windows NT Explorer to map xyzfiles to a
local drive.
Print Spooler Service
The Print Spooler service is a Cluster Server resource
type that can be used to provide fail-over capabilities for
print spooling. Like the IIS Virtual Root and the File
Share service, the Print Spooler service also depends on
disk, IP address, and network name resources; these
resources will be placed in the same resource group.
The following example procedure describes how to set
up the Print Spooler service using a HP LaserJet 5M
printer. The procedure differs slightly for different print-
ers. Make sure that Microsoft TCP/IP Printing has been
installed and the printer is attached to network. Also,
keep the printer's IP address and the Windows NT Server
Enterprise Edition CD available.
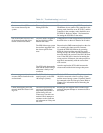
1. Use the New Group wizard to create a new group
called “Spool Service.”
2. Use the New Resource wizard to create a disk
resource called “Spool Disk” or move an existing
shared-disk resource from other groups.
3. Set the Resource Type as Physical Disk. Select
both cluster nodes as possible owners and then
select a shared disk.
There is no dependency for a physical disk.
4. Use the New Resource wizard to create an IP
Address resource called “Spool IP.”
5. Set the Resource Type as IP Address. Select both
nodes as possible owners and then type an IP
address and the subnet mask for your public
LAN.
There is no dependency for IP addresses.
6. Use the New Resource wizard to create a Network
Name resource called “Spool NetName.” Set the
Resource Type as Network Name. Select both
nodes as possible owners. Set Spool IP as the
dependency for Spool NetName. Then type a net-
work name that will be visible to clients (for
example, spoolname).
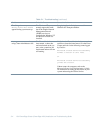
7. Use the New Resource wizard to create a Print
Spooler resource called “X Print.”
8. Set the Resource Type as Print Spooler. Select
both nodes as possible owners. Set Spool Disk,
Spool IP, and Spool NetName as the dependencies
for “X Print.” Then type the spool folder in the
Parameters tab (for example, x:\spool).
9. Bring both resources and the group online.
10. Install the same printer ports and printer drivers
on each cluster node.
a. Install the printer driver—in this example,
JetAdmin for HP printers—using the installa-
tion instructions provided in your printer
documentation.
b. After the printer driver is installed, click the
Start button, point to Settings, and click Control
Panel.
c. Double-click Printers, and then double-click
Add Printer.
d. Select My Computer and click Next.
e. Click Add Port.
f. Highlight HP JetDirect Port and click New Port.
g. Either click Search to find the printer or type its
IP address in the TCP/IP Address field and click
Next.
h. Type a port name, for example
sigport
, and
click Finish.
i. Click Close.