


B-6 Dell PowerEdge Cluster (PowerEdge 4200) Installation and Troubleshooting Guide
R
ack-Mounting the Network
Switch
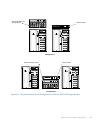
For the 3Com Superstack II Switch 3000 TX to be acces-
sible to the network interface controller (NIC) connectors
on each cluster node, the switch must be placed behind
the keyboard tray with the front of the switch facing
toward the back of the rack.
Use the following procedure to install the network switch
in the rack.
1. If present, remove all self-adhesive pads from the
underside of the network switch.
2. At the back of the rack along one of the vertical
rails, locate the first square hole right below the
mounting rail for the Apex Outlook switch box
(which connects the mouse, keyboard, and moni-
tor), and install a nut cage in the hole. Moving
downward, skip the second and third holes and
install a nut cage in the fourth hole.
3. Attach two cage nuts on the back vertical rail on
the other side of the rack directly opposite of the
two cage nuts you just installed.
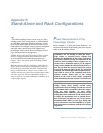
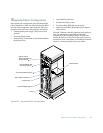
4. With the front of the network switch facing you,
position the mounting bracket over the mounting
holes on one side of the switch, as shown in
Figure B-4.
Figure B-4. Attaching the Rack-Mounting
Hardware on the Network Switch
5. Insert three of the screws included with the
mounting hardware and tighten them securely.
6. Insert the mounting bracket on the opposite side
of the unit.
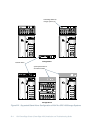
7. Position the network switch inside the rack
behind the keyboard tray with the front of the
switch facing toward the back of the rack (see
Figure B-3).
8. Align the holes on the mounting hardware with
the cage nuts that were installed earlier and
secure them with #10 flat washers and #10-32
screws.
Refer to Chapter 2, “Cabling the Cluster Hardware,” for
instructions on cabling the network switch.
CAUTION: Do not connect cables to the network
switch prior to installing the switch in the rack.
rack-mounting bracket
front of
network switch
screws (3)