


To connect your system to and configure it for use on an Ethernet network, you must complete the following steps:
1. Connect the network cable to the back of your computer.
See the following subsection, Network Cable Requirements, for detailed instructions.
2. Verify that the NIC is enabled in the System Setup program.
See "NIC
" for instructions.
3. Configure the NIC and install the network driver.
See "Configuring the NIC
" for detailed instructions.
4. Run the Network Interface Test Group in the Dell Diagnostics to verify that the NIC is operating properly.
See the chapter titled "Running the Dell Diagnostics" in your Diagnostics and Troubleshooting Guide for detailed
instructions.
Network Cable Requirements
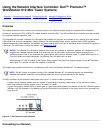
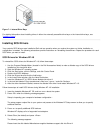
Your computer's NIC connector (an RJ45 connector located on the back panel; see Figure 5-1
) is designed for attaching an
unshielded twisted pair (UTP) Ethernet cable. Press one end of the UTP cable into the NIC connector until the cable snaps
securely into place.
Connect the other end of the cable to an RJ45 jack wall plate or to an RJ45 port on an Ethernet UTP concentrator or hub,
depending on your network configuration. Observe the following cabling restrictions for 10BASE-T and 100BASE-TX networks:
For 10-megabit (Mb) operation, use Category 3, 4, or 5 wiring and connectors. For 100-Mb operation, use Category 5 wiring
and connectors. Voice and data lines should be in separate sheaths.
The maximum cable run length (from a workstation to a concentrator) is 100 meters (m)
(328 feet [ft]).
The maximum number of workstations (not counting concentrators) on a network is 1024.
The maximum number of daisy-chained concentrators on one network segment is four.
Configuring the NIC
This section provides instructions for configuring the computer's integrated, 10/100-megabits-per-second (Mbps) 3Com NIC under
Microsoft Windows NT 4.0 operating systems.
NOTE: If you reinstall Windows NT 4. 0, you must install Service Pack 3 and the Microsoft updated ATAPI driver before
you can install the NIC drivers.
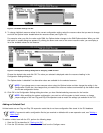
Windows NT 4.0 NIC Driver
The Windows NT 4.0 operating system automatically detects and installs the NIC driver. To reinstall the driver, complete the
following steps.
1. Use the Program Diskette Maker (located in the Dell Accessories program folder) to make a diskette copy of the NIC drivers
installed on your hard-disk drive.
2. Connect the network cable to the back of your computer.
See "Network Cable Requirements
" for detailed instructions.
3. Verify that the NIC is enabled in the System Setup program.
See "NIC
" for more information.
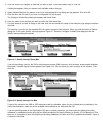
4. Start the Windows NT operating system, and log in as user Administrator or as a user with Administrator privileges.
For information on administrative users and privileges, see your Windows NT documentation.