


either the primary or secondary Pentium II Xeon processor.
CAUTION: The second Pentium II Xeon processor must be of the same type and speed as the first
processor.
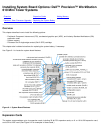
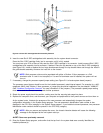
Each Pentium II Xeon processor and its associated L2 (level-2) cache memory are contained in a Slot 2 SEC cartridge that
is installed in a dedicated connector on the system board. In systems with only one Pentium II Xeon processor, a terminator
card is installed in the secondary processor connector. The following subsection describes how to install or replace a Slot 2
SEC cartridge in either the primary or secondary processor connector.
Adding or Replacing a Pentium II Xeon Processor
A Pentium II Xeon processor upgrade kit includes the new Pentium II Xeon processor Slot 2 SEC cartridge with attached
heat sink.
Use the following procedure to add or replace a Slot 2 SEC cartridge.
NOTE: Dell recommends that only a technically knowledgeable person perform this procedure.
1. Unplug the computer from its AC power source.
2. Remove the computer cover according to the instructions in "Removing the Computer Cover
".
CAUTION: See "Protecting Against Electrostatic Discharge".
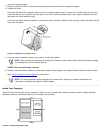
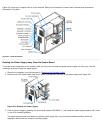
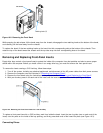
3. Rotate the power supply as described in "Rotating the Power Supply Away From the System Board
".
Be sure the system board standby LED is turned off. If the standby LED is turned on, the computer is not unplugged
from its AC power source.
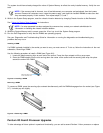
4. If you are adding a second Pentium II Xeon processor to a single-
Pentium II Xeon processor system, remove the terminator card from the secondary Slot 2 SEC cartridge connector
(labeled "SLOT2_SEC").
Unscrew and remove the four large thumbscrews and top bracket that secure the heat sink and the Dell terminator
card to the system board. Pull the terminator card straight out to remove it from the connector. Be sure that the
power requirements for both processors match. Otherwise, the CPU mismatch LED will light up and the system will
not turn on.
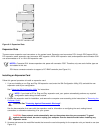
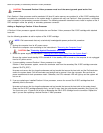
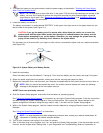
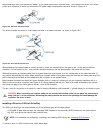
5. If you are replacing an installed Pentium II Xeon processor, remove the current Slot 2 SEC cartridge/heat sink
assembly from its connector.
Unscrew and remove the four large thumbscrews and top bracket that secure the heat sink to the system board.
Grasp the Slot 2 SEC cartridge assembly firmly, and pull it away from the guide bracket assembly (see Figure 9-8).
You must use up to 15 pounds (lb) of force to disengage the Slot 2 SEC cartridge from the connector. Repeat this
step if you are also replacing a second Pentium II Xeon processor.