28
Getting Connected and Installing Drivers (Macintosh)
■
Mac OS settings
Make the following settings so that you can use the MIDI functionality of the PC-50.
For details on connections, refer to
“Basic connections and MIDI flow”
(p. 38).
1
Set the PC-50’s
ADVANCED DRIVER Switch
to the
ON
position.
* Installation cannot proceed as described below if the switch is turned OFF.
2
Use the USB cable to connect the PC-50 to your computer.
1.
Set the PC-50’s power switch to the
OFF
position.
2.
Use the USB cable to connect the PC-50 to your computer.
3
Set the PC-50’s
power switch
to the
USB
position.
4
Open the
Applications
folder of your Macintosh hard disk. In the
Utilities
folder, double-click
Audio MIDI Setup
to open the
Audio MIDI Setup
.
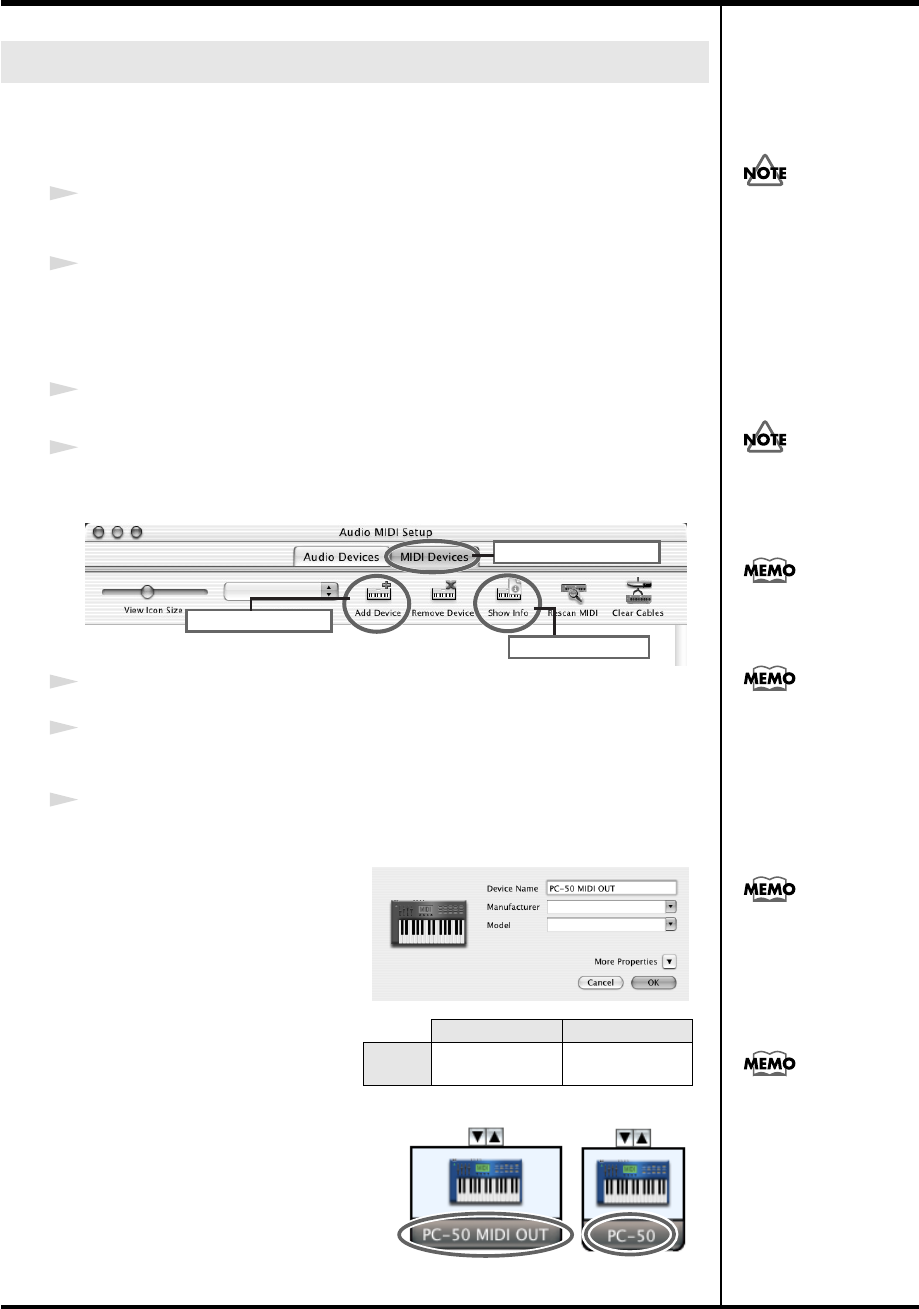
fig.osx2a-e
5
Click the
MIDI Devices
tab.
6
Click
“Add Device”
twice.
Two
new external MIDI devices
will appear.
7
Specify a name for each
new external device
.
1.
Click
Show Info
.
2.
Enter the name in the
Device
Name
field. Enter the
following for each
new
external device
.
Setting the driver
First
Second
Device
Name
PC-50 MIDI OUT
PC-50
Once the connections have
een completed, turn on
power to your various
devices in the order
specified. By turning on
devices in the wrong
order, you risk causing
malfunction and/or
damage to speakers and
other devices.
Connect the cable to the USB
connector of the Macintosh
itself, not to the USB
connector of the keyboard.
This unit is equipped with
a protection circuit. A brief
interval (a few seconds)
after power up is required
efore the unit will operate
normally.
Mac OS X v10.2 was used
in producing the screen
shot shown at left.
5
7
6
Click MIDI Devices
Click Add Dvice
Click Show Info
For details on MIDI device
settings, refer to the
owner’s manual for the
software you are using.
Mac OS X v10.2 was used
in producing the screen
shot shown at left.
PC-50_e.book 28 ページ 2005年11月10日 木曜日 午前10時33分
