


Setup: TCP/IP Setup Page 28
Windows NT 4.0
The following procedure describes how to install TCP/IP on Windows NT 4.0.
If TCP/IP is already installed on your system, see
Configuring TCP/IP
(below). Note
that if you have more than one adapter installed on your system, you will have to use
the adapter that is in use by the Diva 2430.
Procedure
1.
C
lick ‘Start’, ‘Settings’, ‘Control Panel’.
2.
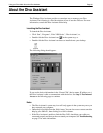
Double-click the ‘Network’ icon. The Network dialog box appears.
3.
Click the ‘Protocols’ tab.
• If ‘TCP/IP’ is not listed, go to
Installing TCP/IP
(below).
• If ‘TCP/IP’ is listed, then the protocol is already installed. Go to
Configuring
TCP/IP
(below).
Installing TCP/IP
1.
From the ‘Protocols’ tab, click ‘Add’.
2.
Select ‘TCP/IP protocol’ as your network protocol, then click ‘OK’.
3.
Click ‘Yes’ to use DHCP.
4.
When prompted, insert the original Windows NT installation CD and enter
d:\i386
(where d: is the drive letter of your CD drive), and click ‘Continue’.
5.
Do not click the ‘OK’ button yet; next you will verify your TCP/IP settings.
Go to
Configuring TCP/IP
(below).
Configuring TCP/IP
1.
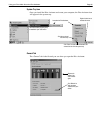
Click the ‘Protocols’ tab.
2.
Select ‘TCP/IP protocol’, then click ‘Properties’.
3.
Select ‘Obtain an IP address from a DHCP server’.
4.
Click the ‘DNS’ tab. Delete any DNS addresses are configured.
5.
Click ‘OK’.
6.
Restart your computer if requested to do so.