


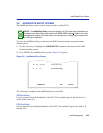

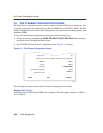

Add/Delete Entry Screen
Local Management 3-23
2. Use the arrow keys to highlight the VCI field and enter a VCI value from 32 to 4095.
3. Use the arrow keys to highlight the Encapsulation Type field and press the SPACE bar until
the appropriate Encapsulation Type displays.
4. Use the arrow keys to highlight the ADD/MODIFY command.
5. Press ENTER. The “PVC HAS BEEN CREATED” message appears at the top of the screen
indicating that Local Management has added the PVC.
3.6.2 Modifying an Entry (PVC)
To modify an existing entry (PVC), perform the following steps:
1. Use the arrow keys to highlight the VPI field, and enter the VPI value of the existing PVC to
be modified.
2. Use the arrow keys to highlight the VCI field, and enter the VCI value of the existing PVC to
be modified.
3. Use the arrow keys to highlight the Encapsulation Type field and press the SPACE bar until
the appropriate Encapsulation Type displays.
4. Use the arrow keys to select the ADD/MODIFY command.
5. Press ENTER. The “PVC HAS BEEN CREATED ” message displays at the top of the screen
indicating that Local Management has modified the PVC.
3.6.3 Deleting an Entry (PVC)
To delete an entry (PVC), perform the following steps:
1. Use the arrow keys to highlight the VPI field and enter the VPI.
2. Use the arrow keys to highlight the VCI field and enter the VCI.
3. Use the arrow keys to highlight the DELETE command.
4. Press ENTER. The “PVC DELETED” message displays at the top of the screen indicating that
Local Management has deleted the PVC.
NOTE: The DELETE command appears only if a valid VPI and VCI of an existing PVC
has been entered in their respective fields.