


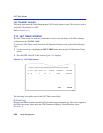

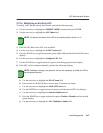
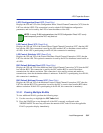

LEC Administration Screen
3-46 Local Management
3. Press the SPACE bar to toggle between the options (1.0 or 2.0) until the desired LANE version
displays.
4. Use the arrow keys to highlight the Configure LEC field.
5. Use the SPACE bar to toggle between the options until Manual displays.
6. Use the arrow keys to highlight the ELAN Name field. Enter a name for the ELAN that is no
more than 32 characters in length.
7. Use the arrow keys to highlight the MAX MTU Size field.
8. Use the SPACE bar to toggle between the options until the desired MTU size displays.
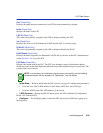
9. Use the arrow keys to highlight the Selective Multicast field.
10. Press the SPACE bar to toggle between the options (Enable or Disable) until the desired option
displays.
11. Use the arrow keys to highlight the LLC Multiplex Capable field.
12. Press the SPACE bar to toggle between the options (Enable or Disable) until the desired option
displays.
13. Use the arrow keys to highlight the Topology Change Frames field.
14. Press the SPACE bar to toggle between the options (Enable or Disable) until the desired option
displays.
15. Use the arrow keys to highlight the LES ATM Address field.
16. Enter the LES ATM Address in the field. Ensure that a valid ATM address is used.
17. Use the arrow keys to highlight the ADD LEC command at the bottom of the screen and press
ENTER. The manually configured LEC is now entered into the VHSIM2-A6DP LEC Index.
NOTE: The following step is optional, and does not have to be performed to configure
the LEC manually. If an ELAN name is specified, however, the LEC will ONLY join the
specified ELAN, and will not accept an ELAN name from the LES.
NOTE: Steps 9 through 14 are not necessary if LANE 1.0 will be used. Although these
fields may be enabled, LANE 1.0 does not support the corresponding features.