


Establishing a Telnet Connection
A-4
Establishing a Telnet Connection
This method opens a Telnet connection to the Terminal Configurator on port 23. Port 23 is
the default for most Telnet programs. This only works after the Ethernet Adapter is
assigned a TCP/IP address. If you need to assign the Ethernet Adapter an IP address you
need to use the Ethernet Adapter Manager or the Terminal Configurator using a direct serial
connection.
To establish a Telnet connection, perform the following steps:
1) Click on the Start menu and select Run…
2) Enter telnet xxx.xxx.xxx.xxx where xxx.xxx.xxx.xxx is the IP address of the
unit you want to configure.
The Terminal Configurator appears on the screen. You have now successfully
opened a telnet connection to Terminal Configurator!
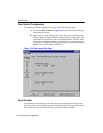
Using the Terminal Configurator
Once you have established a connection to the Terminal Configurator, the Main Menu
screen appears.
• Use the arrow keys to move the highlighted bar. If the arrow keys don’t work,
you can move the bar by holding down the Ctrl key while pressing N (for
Next) and P (for Previous) to move the bar. To select an entry, press the Enter
key.
• To modify the configuration, as described in the following sections, select the
menu item Edit configuration. Another menu, listing available files to edit,
is displayed. Selecting one of them will bring up an editor that you can use to
modify the file. File selection and editor operation are described below.
• After you have finished configuring the Ethernet Adapter, select the Reset
the Unit menu item, and then answer Yes to the confirmation. This resets the
device, allowing the new configuration to take effect as well as place it into
operating mode. Now you are ready to use your new configuration.