


3
Printing Photo Directly with PC Cards
3-23
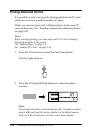
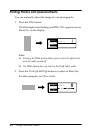
3. Press the
Menus
buttons until the cursor moves to Set No.
next to Copies on the display.
4. Press the
Change Settings
buttons to change the setting for
the selected item. For details about the settings, see the table
below.
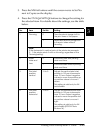
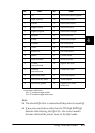
No. Item Set No. Setting
1 Trimming 0 Trims the photo image to fit in
the print area of the paper.
1 Reduces the photo image to fit
in the print area without
trimming.
Note:
If the horizontal to vertical ratio of the photo size exceeds
2 : 1, the printer prints it with no trimming, regardless of the
Trimming setting.
2Index
date and
time
0 Prints the index with printing
date and time.
1 Prints the index without printing
date and time.
3Print start
position,
vertical
-5 to 5 Adjusts the vertical print start
position in 0.5 mm increments:
max. 2.5 mm. Select negative
values to move the position up
or positive values to move it
down.
This setting is valid only for A4
and stickers.
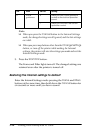
4Print start
position,
horizontal
-5 to 5 Adjusts the horizontal print start
position in 0.5 mm increments:
max. 2.5 mm. Select negative
values to move the position left
or positive values to move it
right.
This setting is valid only for A4
and stickers (EPSON Photo
Stickers 16).