


Summit 200 Series Switch Installation and User Guide 27
2 Switch Installation
This chapter describes the following topics:
• Determining the Switch Location on page 27
• Following Safety Information on page 28
• Installing the Switch on page 28
• Creating a Stack on page 31
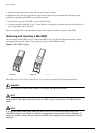
• Installing or Replacing a Mini-Gigabit Interface Connector (Mini-GBIC) on page 29
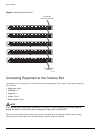
• Connecting Equipment to the Console Port on page 32
• Powering On the Switch on page 34
• Checking the Installation on page 34
• Logging In for the First Time on page 34
CAUTION
Use of controls or adjustments of performance or procedures other than those specified herein can
result in hazardous radiation exposure.
Determining the Switch Location
The Summit 200 series switch is suited for use in the office, where it can be free-standing or mounted in
a standard 19-inch equipment rack. Alternately, the device can be rack-mounted in a wiring closet or
equipment room. Two mounting brackets are supplied with the switch.
When deciding where to install the switch, ensure that:
• The switch is accessible and cables can be connected easily.
• Water or moisture cannot enter the case of the unit.
• Air-flow around the unit and through the vents in the side of the case is not restricted. You should
provide a minimum of 1 inch (25 mm) clearance.
• No objects are placed on top of the unit.
• Units are not stacked more than four high if the switch is free-standing.