


60
Chapter 5: Troubleshooting
www.gateway.com
Setting a static IP address
Typically, the computers on your network are set to obtain an IP address
dynamically (using the DHCP server function of the router) whenever they
contact your local network. However, in certain cases, such as DMZ hosting or
port forwarding, you have to assign a static IP address to a computer so that
its address remains constant and it can be contacted at the same address over
time.
To set a static IP address using Windows XP:
1 Click Start, then click Control Panel. If your Control Panel is in Category
View, click
Network and Internet Connections.
2 Click/Double-click Network Connections.
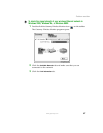
3 Right-click the Local Area Connection that is associated with your network
adapter card, then click
Properties.
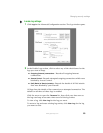
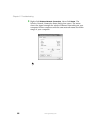
4 In the This connection uses the following items list, click Internet Protocol
(TCP/IP)
, then click Properties.
5 In the IP Address field, type a unique IP address that will not be used by
any other computer on your network. You can use IP addresses between
192.168.1.2 and 192.168.1.99 (IP address 192.168.1.1 is assigned to the
router and the router’s DHCP server assigns addresses from 192.168.1.100
up to 192.168.1.254).
6 In the Subnet Mask field, type 255.255.255.0.
7 In the Default Gateway field, type 192.168.1.1.
8 At the bottom of the window, click Use the following DNS server addresses,
then type the
Preferred DNS Server and Alternative DNS Server (contact your
ISP if you do not have this information).
9 Click OK to close the Internet Protocol (TCP/IP) Properties window, then OK
again to close the Local Area Connection Properties window.