


3-6 Panel C Industrial Computer Hardware User's Manual – May 2003 GFK-2251
3
Configuring Expansion Cards (Legacy ISA Only)
Caution
For most applications an IRQ or address cannot be shared by more than one
resource. If more than one resource is set to the same interrupt or address,
the application may not respond properly and could cause your PC to lock
up. Following these instructions when installing Legacy ISA cards will
prevent problems with resource conflicts.
Legacy ISA cards are the oldest standard and require memory, I/O, and IRQ settings to
be manually set on the card using jumpers, DIP switches, or a configuration program. The
card and system need to have the same hardware settings.
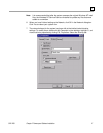
1
. Connect a keyboard, turn on the system power, and press F2 when prompted to enter
the BIOS Setup program.
2
. Select Advanced, then PCI Configuration, and PCS/PNP ISA Resource Exclusion.
3. If the card requires one or more interrupts, go to an IRQ that currently reads
"Available" and change it to "Reserved" by pressing +/-. Do not use an IRQ that
already reads "Reserved."
4
. If the card requires memory space, press the arrow key to return to the PCI
Configuration screen. Select PCI/PNP ISA UMB Region Exclusion. Go to a memory
block that currently reads "Available" and change it to "Reserved" by pressing +/-. Do
not use a memory block that already reads "Reserved."
5
. Press ESC to exit the configuration screen. In the Exit menu, select Exit Saving
Changes and to save and exit Setup. When the screen goes blank, turn off the power.
6
. If the card has jumpers or DIP switches, set them so that they match the IRQ and
memory addresses set in the BIOS Setup.
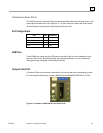
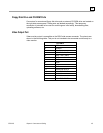
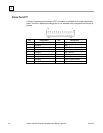
7
. Set the I/O port settings of the card (if any) so that they fall within the ranges labeled
"Available" in the following table.
8
. If the card is set up using a configuration program, proceed with installation, run the
card’s configuration program. Set the IRQ and memory address settings to be the
same as those put into BIOS Setup. Set the I/O port settings (if any) to a range
labeled "Available" in the following table.
Table 3-1. I/O Port Range Table
000-1FF Reserved
200-277 Available
278-2FF Reserved
300-377 Available
378-3DF Reserved
3E0-3EF Reserved
3F0-3FF Reserved