


IDP 75, 250, 800, and 8200 Installation Guide
36 Updating IDP Sensor Software Without NSM
Upgrading Sensor Software
After you have made the software available to NSM, you can use NSM to upgrade
the sensor.
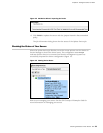
To upgrade the sensor using NSM:
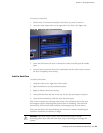
1. From the menu bar, select Devices > Firmware > Change Device Firmware
to open the Change Device Firmware dialog box.
2. Select the devices whose firmware you want to upgrade.
3. Select the firmware you want installed on the device in the Select Target
Firmware Version box.
4. Click Next to display the device(s) and firmware that NetScreen-Security
Manager is to install in the Firmware Update Availability dialog box.
5. Select Automate ADM Transformation to automatically update the Abstract
Data Model (ADM) for the device after NSM installs the firmware. If you clear
the Automate ADM Transformation checkbox, the firmware is installed onto
the device, but you cannot manage the device from NSM until the device ADM
is updated.
6. Click Finish to display upgrade status in the Job Information dialog box.
7. When the upgrade finishes, click Close to exit the Job Information dialog box.
Updating IDP Sensor Software Without NSM
New versions of the IDP sensor software may be made available online or on a
CD-ROM.
To install the new software:
1. Verify that you have SSH enabled for the Management Port (eth0).
To enable SSH, access ACM by typing
https://sensorIPaddress in the Address or
Location box of the Web browser. Then select Modify SSH Access from the
ACM home page and follow the prompts.
access ACM by typing
https://sensorIPaddress in the Address or Location box of
the Web browser.
2. Download the sensor software from Juniper Networks and copy the file to the
/tmp directory of the sensor.
3. Unplug the HA port cable, if one is attached.
4. Log into the IDP sensor as root using the console serial port.
5. Change to the
/tmp directory.
6. Type
sh sensor_<version>.sh
and press Enter.
The sensor update script runs.