


IDP 75, 250, 800, and 8200 Installation Guide
40 Replacing a Hard Drive (IDP 800 and 8200 Only)
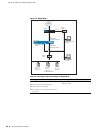
Install a Power Supply
You must have a power supply bay available before you can install a power supply.
To install a power supply:
1. Take the new power supply to the back of the device.
2. Hold the power supply with both hands with the red handle on the left side of
the power supply,
3. Align the power supply with the empty bay and slide the power supply into the
bay.
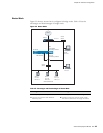
4. Push firmly until you see and hear the red lever snap into place.
If the other power supply is on and powering the sensor, the sensor emits a
high-pitched whine and the power supply LED turns on.
5. Connect a power cord to the new power supply.
6. Attach the other end of the power cord to the power source.
The power supply’s LED turns amber to indicate that the power supply is
receiving power. The LED turns green to indicate that it is receiving power and
is giving power to the IDP sensor (only occurs if sensor is on). The high-pitched
whine stops and the PS FAIL light on the front of the IDP sensor turns off.
Replacing a Hard Drive (IDP 800 and 8200 Only)
The IDP 800 and 8200 sensors come with two mirrored hard drives. Both drives
are hot-swappable on failure. If one fails, it may be replaced without interrupting
the function of the sensor. Contact Juniper Networks if you want to purchase a
spare hard drive.
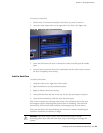
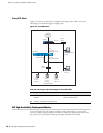
Remove a Hard Drive
SCSI hard drives are accessible from the front panel of the sensor.
CAUTION: The hard drive array is designed to provide fault tolerant redundancy in
the device. Do not remove a drive unless it has failed. The red failure LED will
turns on if a drive has failed.
CAUTION: When one drive is replaced, it takes some time for all the data from the
second drive to be mirrored over to the new drive. Do not remove either drive
during a rebuild.
NOTE: We recommend replacing a hard drive only when the sensor is powered
on.