


14
Controls and Features (Cont.)
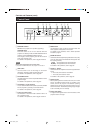
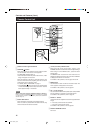
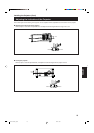
Remote Control Unit
1
Remote control’s signal transmitter
2
OPERATE button
When the projector is in stand-by mode, press this button
for one second or more to turn on the projector.
The OPERATE indicator lights up.
• About 30 seconds after the power has turned on, video
image will appear on the screen.
When the projector is turned on, press this button for one
second or more so that the projector goes into cool-down
mode before going to stand-by mode.
For details, refer to “CAUTIONS” on page 11.
• The OPERATE
button will not work for approximately
1 minute after the light-source lamp is turned on. Use the
button approximately 1 minute later.
Memo
While in cool-down mode (the STAND BY indicator is blinking):
Even if you press the OPERATE button, the projector is not turned
on. Wait until the projector enters stand-by mode. (The STAND BY
indicator stays lit.)
3
BACK LIGHT button
When this button is pressed, all the buttons light up.
When no button is pressed while the buttons are lit, they
will be turned off after several seconds.
Memo
t
RM-MQX1G REMOTE CONTROL UNIT
KEY
STON
RM-MQX1G REMOTE CONTROL UNIT
O
EX
E
N
LOCK
UNLOCK
LOCK UNLOCK
p
r
w
6
5
4
3
2
1
7
8
q
e
MODE
EXIT
ZOOM
KEYSTONE
SHUTTER
DIGITAL
ZOOM
SHIFT FOCUS
VIC1 VIC2 VIC3
MENU
ENTER
OPERATE
BACK
LIGHT
T
W
T
W
ON
OFF
9
y
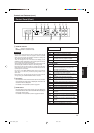
4
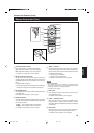
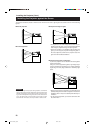
Cursor (5/∞/2/3) / ENTER button
When using this as the cursor button, press it in the
5/∞/2/3 directions to select menu items or adjust settings.
When using it as the ENTER button, press the button
straight down.
The ENTER button is used in the menu mode. Use it to
display the hierarchical menus. Also use it when “ENTER”
is displayed for the item on the menu.
For details on the operation, refer to pages 16 and 42.
5
MENU button
Use this button to enter or exit from the menu mode. The
menu appears or disappears on the screen.
For details on the operation, refer to page 42.
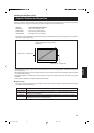
6
VIC 1, 2, and 3 buttons
You can select the desired VIC (Video Input Card) installed
into the projector by pressing one of these buttons.
For details on the operations, refer to page 34.
7
FOCUS +/– buttons
Use these buttons to adjust the focus of the projected video
image.
+: The focus point becomes more distant.
–: The focus point becomes nearer.
For details on the operation, refer to page 35.
8
DIGITAL ZOOM T/W buttons
Not in use.
EN07-16QX1G_f.pm6 02.3.7, 13:3714