


1918
Loading film holders
Handling film
Where is the emulsion?
To achieve the best possible reproduction from the scanner, the film and film holder should be
free from dust and dirt. Always work with processed film in a clean, dust-free environment.
Handle film by the edges or mount to prevent fingerprints and dirt marring the image area.
Special lint-free gloves are available from photographic equipment retailers for film handling as
well as anti-static cloths, brushes, and blowers for removing dust. Film cleaner can be used to
remove oil, grease, or dirt from film; carefully follow the manufacturer's instructions and precau-
tions for the film cleaning solvent.
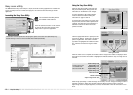
When film placing film in a holder, the emulsion side of the film should be down. When viewing
the film image, if the image is orientated correctly rather than a mirror image, the emulsion side
is facing down. If the image is abstract or symmetrical so its orientation is difficult to determine,
the emulsion is down if the frame numbers and edge markings can be read correctly. With
mounted slides, the emulsion is on the same side of the mount as the film manufacturer's or
processor’s name is printed.
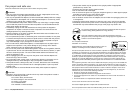
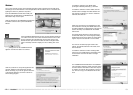
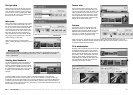
Film strips of up to six frames can be
loaded into the 35mm film holder. To open
the holder, lift the latch and swing open the
cover.
With the emulsion down, place the film in
the holder and under the retaining tabs.
Align the film with the frame apertures.
Carefully lower the cover until the latch
clicks into place. Take care not to move the
film during this operation.
Loading 35mm film strips
Loading film holders
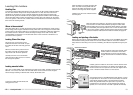
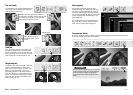
Carefully push the holder into the scanner until the insertion mark
is aligned with the scanner door; the holder is automatically fed
into the scanner from that point and an index scan begins. Never
touch or hinder the holder when it is in the scanner.
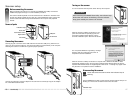
Loading and ejecting a film holder
Before using the scanner, install the DiMAGE Scan Utility. Launch one of the DiMAGE Scan Utility
drivers before inserting the film holder. Do not insert the film holder into the scanner while the
utility software is launching or the scanner is initializing; the indicator lamp blinks during this peri-
od.
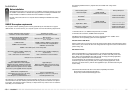
When the indicator lamp glows steadily, insert
the film holder into the scanner in the direc-
tion indicated by the arrow. Hold the holder
straight and level with the orientation indicator
up.
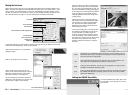
Loading mounted slides
Up to four mounted slides can be inserted into the slide mount holder. The slide mounts must be
between 1 mm and 3,2 mm thick to fit the holder. Glass mounts cannot be used; the glass
refracts the light resulting in distorted and unevenly illuminated scans.
Place the slides in the holder emulsion side
down. The slide must be parallel with the
length of the holder otherwise the top and
bottom of the image area will be cropped.
Carefully lower the cover until both latches
click into place.
To open the holder, lift both latches and
swing open the cover.
When the slide mount holder is in the scanner, the last slide can be
removed and a new slide inserted without ejecting the holder. When
replacing slide, take care not to change the holder position. If the slide
is not accessible, press the eject button once to move the slide holder
to the correct position; pressing the eject button twice ejects the holder.
A prescan should be made each time a slide is inserted; see page 29.
Emulsion
side
Click the eject button in the DiMAGE Scan Utility window or press
the eject button on the scanner to remove the holder; the scanner
automatically ejects the holder to its initial insertion position.
When using the slide holder, the eject button may have to be
pressed twice. If the scanner is turned off before the holder is
ejected, turn on the scanner; the holder is ejected automatically.
Insertion mark
Orientation indicator