


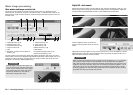

2524
Easy scan utility
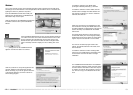
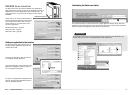
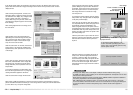
If the adjust-image option was checked in the previous screen, the adjust-image screen is dis-
played. The same automatic image-processing functions shown in the previous screen are also
displayed here.
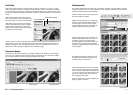
Click and drag the brightness, contrast, and
saturation sliders to adjust the image; changes
are reflected in the display. Any changes made
remain in effect until reset or the utility is
closed. Returning to the previous screen and
unchecking the adjust-image box will not reset
these settings.
After making adjustments to the image, click
the next button.
Click the tabs on the left of the dialog box
depending if the scanned image is to be print-
ed or saved as a file. Click the button which
describes the output of the scanned image.
Only one choice can be made.
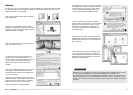
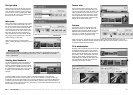
Click the scan button to continue; the save-as
screen opens. If an image has multiple uses,
repeat the Easy Scan procedure for each use
of the image.
On the save-as screen, specify the file name,
file format, and destination of the image data.
See page 33 for more about formats. When
saving JPEG files, the compression ratio can
be specified.
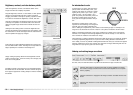
To scan all the images in the film holder, click
the scan-all-images check box. Any image pro-
cessing selected is applied to all frames.
Click the save button to begin the final scan.
When using a USB storage device on the same bus as the scanner, save the data on the com-
puter’s hard disk first before transferring it to the storage device. Saving the scanned data direct-
ly to the device may corrupt the image data.
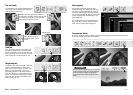
After the scanning is completed, the image is
ready to use. Click the appropriate button to
continue or close the utility. The quit button
closes the Easy Scan Utility and ejects the film
holder. The replace-film button ejects the hold-
er so the film can be changed. The continue
button allows other images in the film holder to
be scanned.
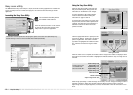
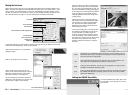
If the image was scanned for printing, the print
preview dialog box opens to allow the data to
be printed. The number of prints can be speci-
fied in the copies text box. Uncheck the print-
this-image check box to exclude an image
from the print run.
To change the printer settings, click the printer-
setup button. Any changes made are displayed
in the print preview display.
If the print size set with the Easy Scan Utility is
not compatible with the printer, the page size is
automatically reset and highlighted in red.
When using Mac OS 9.2.2, the printer name is
not displayed and the number of copies cannot
be selected. Click the printer-setup button and
specify the printer and number of copies in the
print setup dialog box.
Click the print button to print. Click the cancel
button to cancel the print operation; the image
data has been saved and can be printed at
anytime.
Scan-all-images check box
Scanner Notes
The Easy Scan Utility uses a color depth of 8 bit per channel. Data is saving using
an sRGB color space. Color matching is not used with Digital ROC. Autoexposure is not used
with black and white positive film.
When printing images B4 or larger using Mac OS 9, 256MB of RAM is required in addition to
the memory requirements for the OS and application.
With a Macintosh OS 9 operation system, to cancel an index scan, prescan, or final scan
once it has started, click and hold the mouse on the cancel button in the progress dialog box
or press and hold the command and period (.) keys until the cancel button appears to
depress.
Next image
Previous image
Frame / Number of images
Preview display
Copies text box
Print-this-image check box
To access the printer dialog box. The
screen varies with operating system and
printer; refer to the operating system’s help
and the printer manual.