• Fn+P: Has the same function as the Pause key.
• Fn+S: Has the same function as the SysRq key.
• Fn+K: Has the same function as the ScrLK key.
You can toggle the ThinkPad F1-F12 key functionality to use the keys in default mode or in legacy mode. In
default mode, you can initiate the special functions illustrated on each key by pressing the corresponding
key directly. In legacy mode, to initiate the special functions illustrated on each key, press and hold the Fn
key and then press the desired function key, then release both keys.
To toggle the F1-F12 key functionality in the Windows environment, do the following:
1. Open the ThinkPad Keyboard Properties window by pressing the Fn lock key.
2. Congure the settings following the instructions on the screen.
To toggle the F1-F12 key functionality through the ThinkPad Setup program, do the following:
1. Start the computer. When the ThinkPad logo screen is displayed, press F1. The ThinkPad Setup
program main menu opens.
2. Select Cong ➙ Keyboard/Mouse ➙ Change to F1-F12 keys.
3. Congure the settings following the instructions on the screen.
4. Save changes and exit.
2 Windows key
Press this key to switch between the current workspace and the Start screen.
For information about using the Windows key with other keys, refer to the help information system of the
Windows operating system.
Using the UltraNav pointing device
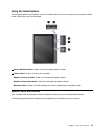
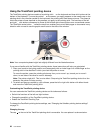
Your computer comes with the UltraNav pointing device. The UltraNav pointing device consists of the
TrackPoint pointing device and the touch pad, each of which is itself a pointing device with both basic and
extended functions. You can congure both devices by choosing the settings you prefer.
• Set both the TrackPoint pointing device and the touch pad as pointing devices.
• Set the TrackPoint pointing device as the main pointing device and the touch pad for scrolling, tap
zones, and slow-motion pointer functions only.
• Set the TrackPoint pointing device as the main pointing device, and disable the touch pad.
• Set the touch pad as the main pointing device, and disable the TrackPoint pointing device.
Changing the UltraNav pointing device settings
To change the UltraNav pointing device settings, do the following:
1. Move the cursor to the top-right or bottom-right corner of the screen to display the charms. Click
Settings ➙ Control Panel.
2. Click Hardware and Sound ➙ Mouse ➙ UltraNav.
3. Change the settings as you desire.
You also can change the UltraNav pointing device settings by clicking the UltraNav icon in the Windows
notication area. To display the UltraNav icon in the Windows notication area, see “Adding the UltraNav
icon to the Windows notication area” on page 24.
Chapter 2. Using your computer 21


