


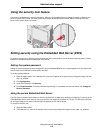


Setting security using the Embedded Web Server (EWS)
117
Administrative support
Printing Lockout
Printing Lockout allows locking or unlocking of a printer using an assigned PIN. When locked, every job the printer receives
will buffer to the hard disk. A user can print jobs only by entering the correct PIN on the operator panel. A PIN can be
assigned through the Web page of the device.
Note: This setting is only available when a hard disk is installed.
Note: Back channel data will be processed while the printer is locked. Reports such as user or event logs
can be retrieved from a locked printer.
To set Printing Lockout:
1 Open the Web browser. In the address line, enter the IP address of the printer being configured using the format:
http://ip_address/.
2 Click Configuration.
3 Under Other Settings, click Security.
4 Click Printer Lockout PIN.
Confidential Print Setup
Confidential Print Setup allows the designation of a maximum number of PIN entry attempts and allows setting an
expiration time for print jobs. When a user exceeds a specific number of PIN entry attempts, all of that user’s print jobs are
deleted. When a user has not printed their jobs within a designated time period, the print jobs are deleted. To activate
Confidential Print Setup:
Note: This feature is only available on network models.
1 Open the Web browser. In the address line, enter the IP address of the printer being configured using the format:
http://ip_address/.
2 Click Configuration.
3 Under Other Settings, click Security.
4 Click Confidential Print Setup.