


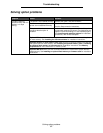
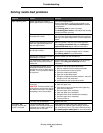

Solving print quality problems
91
Troubleshooting
Solving print quality problems
Many print quality problems can be solved by replacing a supply or maintenance item that is approaching the end of its
intended life. Check the operator panel for a message about a printer consumable. See Determining the status of
supplies for information about other ways to identify consumables that need to be replaced.
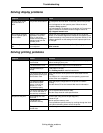
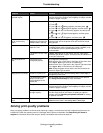
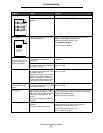
Job takes longer than
expected to print.
The job is too complex. Reduce the complexity of the print job by eliminating the number
and size of fonts, the number and complexity of images, and the
number of pages in the job.
Page Protect is set to On. Set Page Protect to Off from the Setup Menu in Settings.
1 Press .
2 Press until Settings appears, and then press .
3 Press until Setup Menu appears, and then press .
4 Press until Print Recovery appears, and then press
.
5 Press until Page Protect appears, and then press
.
6 Press until Off appears, and then press .
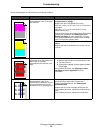
Job prints from the wrong
tray or on the wrong
media.
The operator panel menu
settings do not match the
media loaded in the tray.
Make sure the Paper Size and Paper Type specified on the
operator panel and in the printer driver are correct for the job
being printed.
Incorrect characters print. An incompatible parallel
cable is in use.
If using a parallel interface, make sure to use an IEEE 1284-
compliant parallel cable. Lexmark part number 1329605 (10 ft)
or 1427498 (20 ft) for the standard parallel port are
recommended.
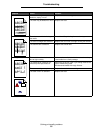
The printer is in Hex Trace
mode.
If Ready Hex appears on the display, exit Hex Trace mode;
otherwise, the job will not print. Turn the printer off and back on
to exit Hex Trace mode.
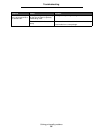
Tray linking does not
work.
Tray linking is not
configured properly.
To configure the linked trays:
Make sure the Tray x Size value in the Paper X Size menu item
in the Paper Menu is the same for all linked trays.
Make sure the Tray x Type value in the Paper X Type menu item
in the Paper Menu is the same for all linked trays.
Note: Select the paper source and the size first, and then the
screen for Paper Type is shown.
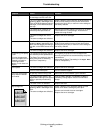
Large jobs do not collate. Collate is not set to On. Set Collation to On in the Finishing Menu in Settings or
through the printer driver.
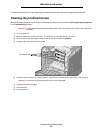
The standard bin media
stop is not set to the
correct position for the
media size.
Set the media stop in the standard bin to the correct position.
See Using the media stop for more information.
The job is too complex. Reduce the complexity of the print job by eliminating the number
and size of fonts, the number and complexity of images, and the
number of pages in the job.
The printer does not have
enough memory.
Add printer memory or an optional hard disk.
See the Setup sheet for information on adding an optional
memory card and Installing an optional hard disk for adding
an optional hard disk.
Unexpected page breaks
occur.
The job has timed out. Set the Print Timeout menu item to a higher value from the
Timeouts menu item in the Setup Menu in Settings.
Symptom Cause Solution