


Rev. P. Dokument N Signature Data
ТЭ3.623.912-03РЭ
ТЭ3.623.912-03РЭ
Rev. P. Dokument N Signature Data
Size А3 /А4
Signature and Data
Invent N of doubl
Subst. of invent N
Signature and Data
Invent N of orig.
3 MAINTENANCE
3.1 Servicing of Device
3.1.1 General Guidelines
Servicing of the device is performed for maintaining operability of the device within the
whole service life.
Servicing envisages carrying out examinations No.1 and No.2 and maintenance of the
device as well as their execution order and contents when the object on which the TV-
complex is installed stays at the depot.
Maintenance should not be carried out in case of intended use of the device.
Maintenance should be performed by two qualified specialists having radio
engineering education with TV and computer techniques specialization. At least one of the
specialists must have a higher education.
3.1.2 Safety Measures
A life-hazardous voltage of 220 V, 50 Hz is used in the device.
Only personnel allowed for work with voltages of up to 1000 V should maintain the
device.
When servicing all operations that are not associated with the device parameters
check-up during examination No.2 are done on the de-energized device.
Never replace fuses, remove the included modules or unlink the connectors of
external cables when the device is energized.
3.1.3 Maintenance Execution Order
3.1.3.1 Examination No.1.
Examination No.1 includes the following actions done without removing the modules
and units from the device:
- visual inspection of the device and front panels of its modules behind the door of the
cabinet, cleaning the outside of dirt, dust and moisture;
- check on paint and electroplate coatings;
- check on the conditions in the place of installation and operation, with making a
decision on possibility of using the device under such conditions.
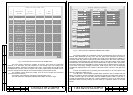
3.1.3.2 Examination No.2
Examination No.2 includes Examination No.1 in full and besides the operability check-
up in accordance with items 2.2.5.2 - 2.2.5.8 of the present Manual.
3.1.3.3 Maintenance.
Maintenance involves removal of the electronic modules from the installation places
and includes Examinations No.1 and No.2 in full and also some additional measures:
- cleaning of the device inside of dust with a vacuum cleaner using a soft brush;
- check on the condition of printed circuit tracks in the electronic modules;
- check on the condition of connector contacts;
- check on whether the plastic details have flaws or dents.
3.1.3.4 Examination No.1 should be done daily, the device being in the off-state.
Examination No.2 should be done weekly.
Maintenance should be carried out once in half a year or if necessary. If a faulty
module is detected, it should be replaced with a serviceable one from the DSP or BSP. While
replacing, the POWER toggle switch on the assembly unit must be in the off position.
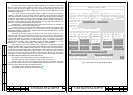
3.1.4 Replacement of Modules in Device
When replacing the TVM, modules and units of the device use the wrench fastened on
the inside face of the door and the tools of the toolkit from the TV-complex BSP (box 2/8).
3.1.4.1 Replacement of ЭМ-1204-1 and ЭМ-1205-1 videoswitch modules, ЭМ-1209-1
controller, ЭМ-1211 diagnostics module, ЭМ-1213 power supply units and ЭМ-1242 interface
unit.
Modules and units are removed from the device in the following order:
- unscrew the two captive screws fixing the module (unit) front panel in the device;
- put the special wrench into the slot of the module (unit) lock and turn the wrench by
180º counter clockwise, the module (unit) should move out by approximately 10 mm;
- remove the module (unit) from its place by careful pulling it out.
Installation of a serviceable module (unit) of the BSP into the device is done as
follows:
- set the horizontal slide rails of the module (units) into the slots in the device;
- push in the module (unit) up to the stop, about 10 cm off the final position;
- put the wrench into the slot of the module (unit) lock and slightly pushing the module
(unit) in turn the wrench clockwise by 180º. The module (unit) should move into the working
position;
- put on the captive screws on the module (unit) front panel.
3.1.4.2 Replacement of the ЭМ-1212-1 control module is done as follows:
- unscrew the three captive screws fixing the module (unit) front panel in the device;
- by turns put the wrench into the slots of the left and the right locks of the module and
turn it counter clockwise by 30-60º each time. Acting as described above, move the module
out by approximately 10 mm;
P. P.
36
35